Setting up a ProPride 3P® Hitch might sound technical—but don’t worry, it's more approachable than it seems. Proper installation turns your trailer and tow vehicle into a synchronized team, delivering stability, safety, and confidence on every mile.
Whether you’re new to towing or simply upgrading your setup, this clear, step‑by‑step guide will walk you through the process. You’ll unpack and inspect your kit, assemble the main components, securely install the hitch on your vehicle, and fine‑tune the settings for the smoothest ride possible.
Plus, you’ll learn insider tips to avoid common installation mistakes.
In this blog, you’ll learn:
- How to inspect and assemble each hitch component correctly
- Best practices for safe and secure installation
- Fine‑tuning techniques for height, sway control, and balance
Get ready to take the guesswork out of hitch installation—and tow like a pro thanks to the precision and performance of the ProPride 3P® Hitch.
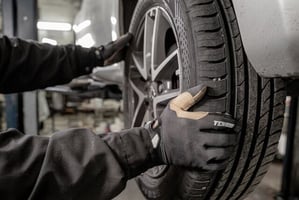
1. Unpack and Inspect Your ProPride 3P® Hitch
Before connecting anything, ensure you're working with a complete, damage‑free kit—trust begins here!
Start by laying out all components on a clean, flat surface:
- Main hitch frame
- Yokes, brackets, sway bars
- Bolts, nuts, pins, and hardware
- Instruction manual (keep it close)
Inspection Walkthrough
- Visual Check: Inspect welds, frame integrity, and hardware finish.
- Hardware Review: Verify bolt counts and inspect threading.
- Damage Scan: Look for bends, cracks, missing parts, or shipping dings.
Pro Tip: Mark off each component as it's inspected. It’s faster and helps prevent missing parts later.
A careful inspection now prevents major headaches down the road.
2. Assemble the Main Hitch Components
With your parts ready, it’s time for assembly—let’s build your towing foundation!
- Attach Yokes to the Main Frame: Align the yokes and hand‑tighten bolts to hold them in place before full torque.
- Mount Brackets for Sway Bars: Slide brackets into their slots and tighten securely—accuracy here ensures proper sway control.
- Install the Sway Bars: Connect each bar to its bracket using supplied pins and fasteners. Ensure they swing freely and lock properly.
- Torque to Specification: Use a torque wrench to tighten all bolts to the exact values in your manual. No guessing—precision matters.
Quick Check: Each sway bar should pivot without grinding. Retighten anything that feels loose or misaligned.
3. Install the Hitch on Your Vehicle
Now that the hitch is assembled, it's time to integrate it with your vehicle.
- Align with Receiver: Back your vehicle toward the hitch receiver and push it in until the mount holes align.
- Insert Hitch Pin and Clip: Make sure it locks firmly in place—wiggle it to verify stability.
- Attach Safety Chains: Cross the chains under the tongue and secure them to designated anchor points.
- Connect Electrical Wiring: Plug trailer wiring in and test your lights and brake signals.
Your installation should feel snug—no rattle, no wiggle, just a secure fit.
4. Adjust for Height, Sway Control, and Balance
Fine-tuning these settings safeguards your trailer from tipping, swaying, or uneven wear.
Hitch Height & Leveling
- Measure hitch height and level it with your trailer’s coupler.
- Too low? Hitch is undersized.
- Too high? Trailer may bounce or have poor handling.
Sway Control Tension
- Use the tension knob or bolt to adjust sway bar tightness.
- Aim for light resistance during turns without binding or noise.
Weight Distribution Bars
- Adjust bars so the front of your vehicle tilts slightly downward—indicating balanced weight.
- Recheck hitch height after adjustment—it should still be level.
Common Hitch Setup Issues and What They Cause
|
Setup Error |
Likely Cause |
Symptom on Road |
Quick Fix |
|
Loose sway bars |
Hardware not torqued correctly |
Trailer yawing during turns |
Fully tighten bars per torque spec |
|
Hitch too low/high |
Misalignment after load changes |
Rough ride or poor tracking |
Re-level hitch and test at low speed |
|
Sway tension too tight |
Over-adjustment for sway control |
Binding or creaking on turns |
Loosen tension by one notch |
|
Weight bars uneven |
Unequal load on each side |
Lurching or vehicle pull |
Rebalance load and retighten attachment |
This table makes it easy to identify and correct common issues without guesswork.
5. Do a Low-Speed Test Drive
You're not done yet—testing seals the deal with peace of mind.
Test Drive Checklist
- Drive in an open, low-traffic area
- Turn sharply left and right—listen for odd sounds
- Pull forward and reverse to test sway response
- Listen for rattles, creaks, or metal contact
After the test, recheck all bolts and connections. Make adjustments if anything feels loose or noisy.
6. Fine-Tuning & Troubleshooting
Even after test drives, fine-tuning your setup can unlock the ProPride 3P® Hitch’s full potential and resolve any nagging quirks.
Common Adjustments
- Re-check Hitch Height: After driving a few miles, verify that the trailer remains level. Adjust if it’s tilting.
- Re-balance Weight Distribution Bars: If the front of your tow vehicle lifts or sags excessively, fine-tune the bar tension.
- Adjust Sway Control Tension: Too tight? You might hear creaking—ease the tension. Too loose? You’ll feel yawing—tighten accordingly.
Troubleshooting Table
|
Symptom |
Possible Cause |
Quick Fix |
|
Trailer pulls left/right |
Uneven weight distribution |
Shift load or re-adjust bars |
|
Clunking over bumps |
Loose sway bracket or bar |
Re-torque hardware per manual |
|
Hitch rattles at highway speeds |
Pin or clip loosely fastened |
Inspect pin, replace clip, lubricate contact points |
7. Final Safety & Quality Checks
Before hitting long highway miles, run through these last-minute checks to ensure nothing’s been overlooked.
Pre-Departure Safety Walk
- Hardware Tightness: Give all bolts, nuts, and hitch pins a last torque check.
- Lubrication: Apply grease to moving parts like coupling points and hinge areas.
- Electrical & Brakes: Plug in and test brake lights, indicators, and emergency brake safety wiring.
- Safety Chains: Ensure they are not dragging and are correctly crossed beneath the coupler.
Graduating your setup through these routine checks primes your equipment for real-world use and maximizes safety.
8. Pro Tips for Hassle-Free Long-Term Use
Once the basic setup is solid and selections are done, these tips make every towing trip smoother and safer.
- Record Your Settings: Write down bar tensions, hitch height, bolt torques, and load configuration. Saves time next setup.
- Professional Alignment Check: Especially after rough travel, a quick undercarriage look by a pro can identify hidden misalignments.
- Routine Re-Checks: After 50, 100, and 200 miles, stop and verify everything; adjust if needed.
- Invest in Upgraded Components: Wear items like pins, bushings, or sway brackets bear most stress—replacing them with premium parts avoids breakdowns.
A spreadsheet or printed guide stored in your glovebox ensures consistent setup, even if someone else handles your trailer.
Wrapping It Up
Installing and fine-tuning your ProPride 3P® Hitch isn’t just about getting the job done—it’s about unlocking towing peace of mind. When each bolt, sway control bar, and tension setting is dialed precisely, your trailer becomes an extension of your vehicle, trustworthy and predictable.
This guide has walked through every stage—from unpacking and assembly to troubleshooting, fine-tuning, and pre-trip safety checks—equipping you for confident towing. If you follow these steps and checklists, you’ll reduce worry, avoid breakdowns, and experience the smoothest rides.
Embrace ProPride’s engineered difference, and every road will feel safer, easier, and more in control.
Frequently Asked Questions
Even the most careful setup can raise questions down the line. Here are answers to common concerns that users often encounter post-installation.
How frequently should I re-check my hitch hardware?
After your first few drives, re-torque bolts and inspect all sway components. Then repeat checks every 100–200 miles or after rough road conditions. Consistency prevents wear-related failures and ensures continued safety.
Can ProPride bars be used with different trailer weights?
Yes, as long as the hitch and bars are rated for your trailer’s maximum weight. Adjust bar tension and weight distribution each time you significantly alter your trailer’s load or travel terrain.
Why does my trailer sway slightly during sharp turns?
A bit of pivoting is normal—excessive sway means the sway-control tension is too loose or weight distribution is off. Gradually increase tension until cornering is stable and smooth.
Is it okay to tow on rough roads with this setup?
Absolutely—as long as tension settings are correct and hardware is tight. However, after rough terrain, stop to inspect for loosened bolts or shifted cables to ensure everything remains solid.
How do I store my ProPride hitch during off-season?
Clean off road grime, lubricate each moving part, and apply anti-rust spray to metal surfaces. Store everything in a dry area, preferably off the ground, in its protective case or wrap to preserve longevity.