
What if you could physically move your trailer's pivot point forward to your truck's rear axle, effectively making trailer sway a mathematical impossibility? You have already made the choice to prioritize safety by investing in the 3P system, and now it's time to ensure that engineering excellence translates to the road. You understand that "good enough" is never an option when protecting your family and your investment. This propride hitch installation guide provides the technical roadmap you need to master the setup process, transforming complex mechanical components into a seamless extension of your tow vehicle. It is the final step in securing the Best Hitch on the Planet for your journey.
We agree that the fear of an incorrect installation or the anxiety of modifying your trailer frame can be daunting. However, the ProPride 3P is designed for precision, not guesswork. By following this methodical process, you will achieve a perfectly level trailer and the total elimination of sway through our patented Pivot Point Projection technology. We'll walk through the assembly of the v2 Jacks and the calibration of the weight distribution bars, all while honoring the Jim Hensley design legacy. This guide ensures you meet the Responsible Towing Standard, giving you the quiet confidence that only comes from knowing your equipment is installed to professional grade specifications.
Key Takeaways
- Learn how to properly prepare your trailer tongue and clear away legacy friction-based equipment to create a safe foundation for this propride hitch installation guide.
- Master the assembly of the main unit and adjustable hitch bar to leverage Pivot Point Projection, ensuring your trailer remains perfectly level and sway-free.
- Discover how to correctly position the V2 Weight Distribution Jacks and frame brackets to avoid interference with battery boxes or propane trays for a clean, professional setup.
- Understand the vital role of the yoke in locking your system and how to calibrate the tail for the snug, movement-free fit required to meet The Responsible Towing Standard.
- Gain practical, actionable tips for your very first Hensley-style hitch-up, including specific techniques for aligning the stinger with the main unit box every time.
Preparation: The Foundation of The Responsible Towing Standard
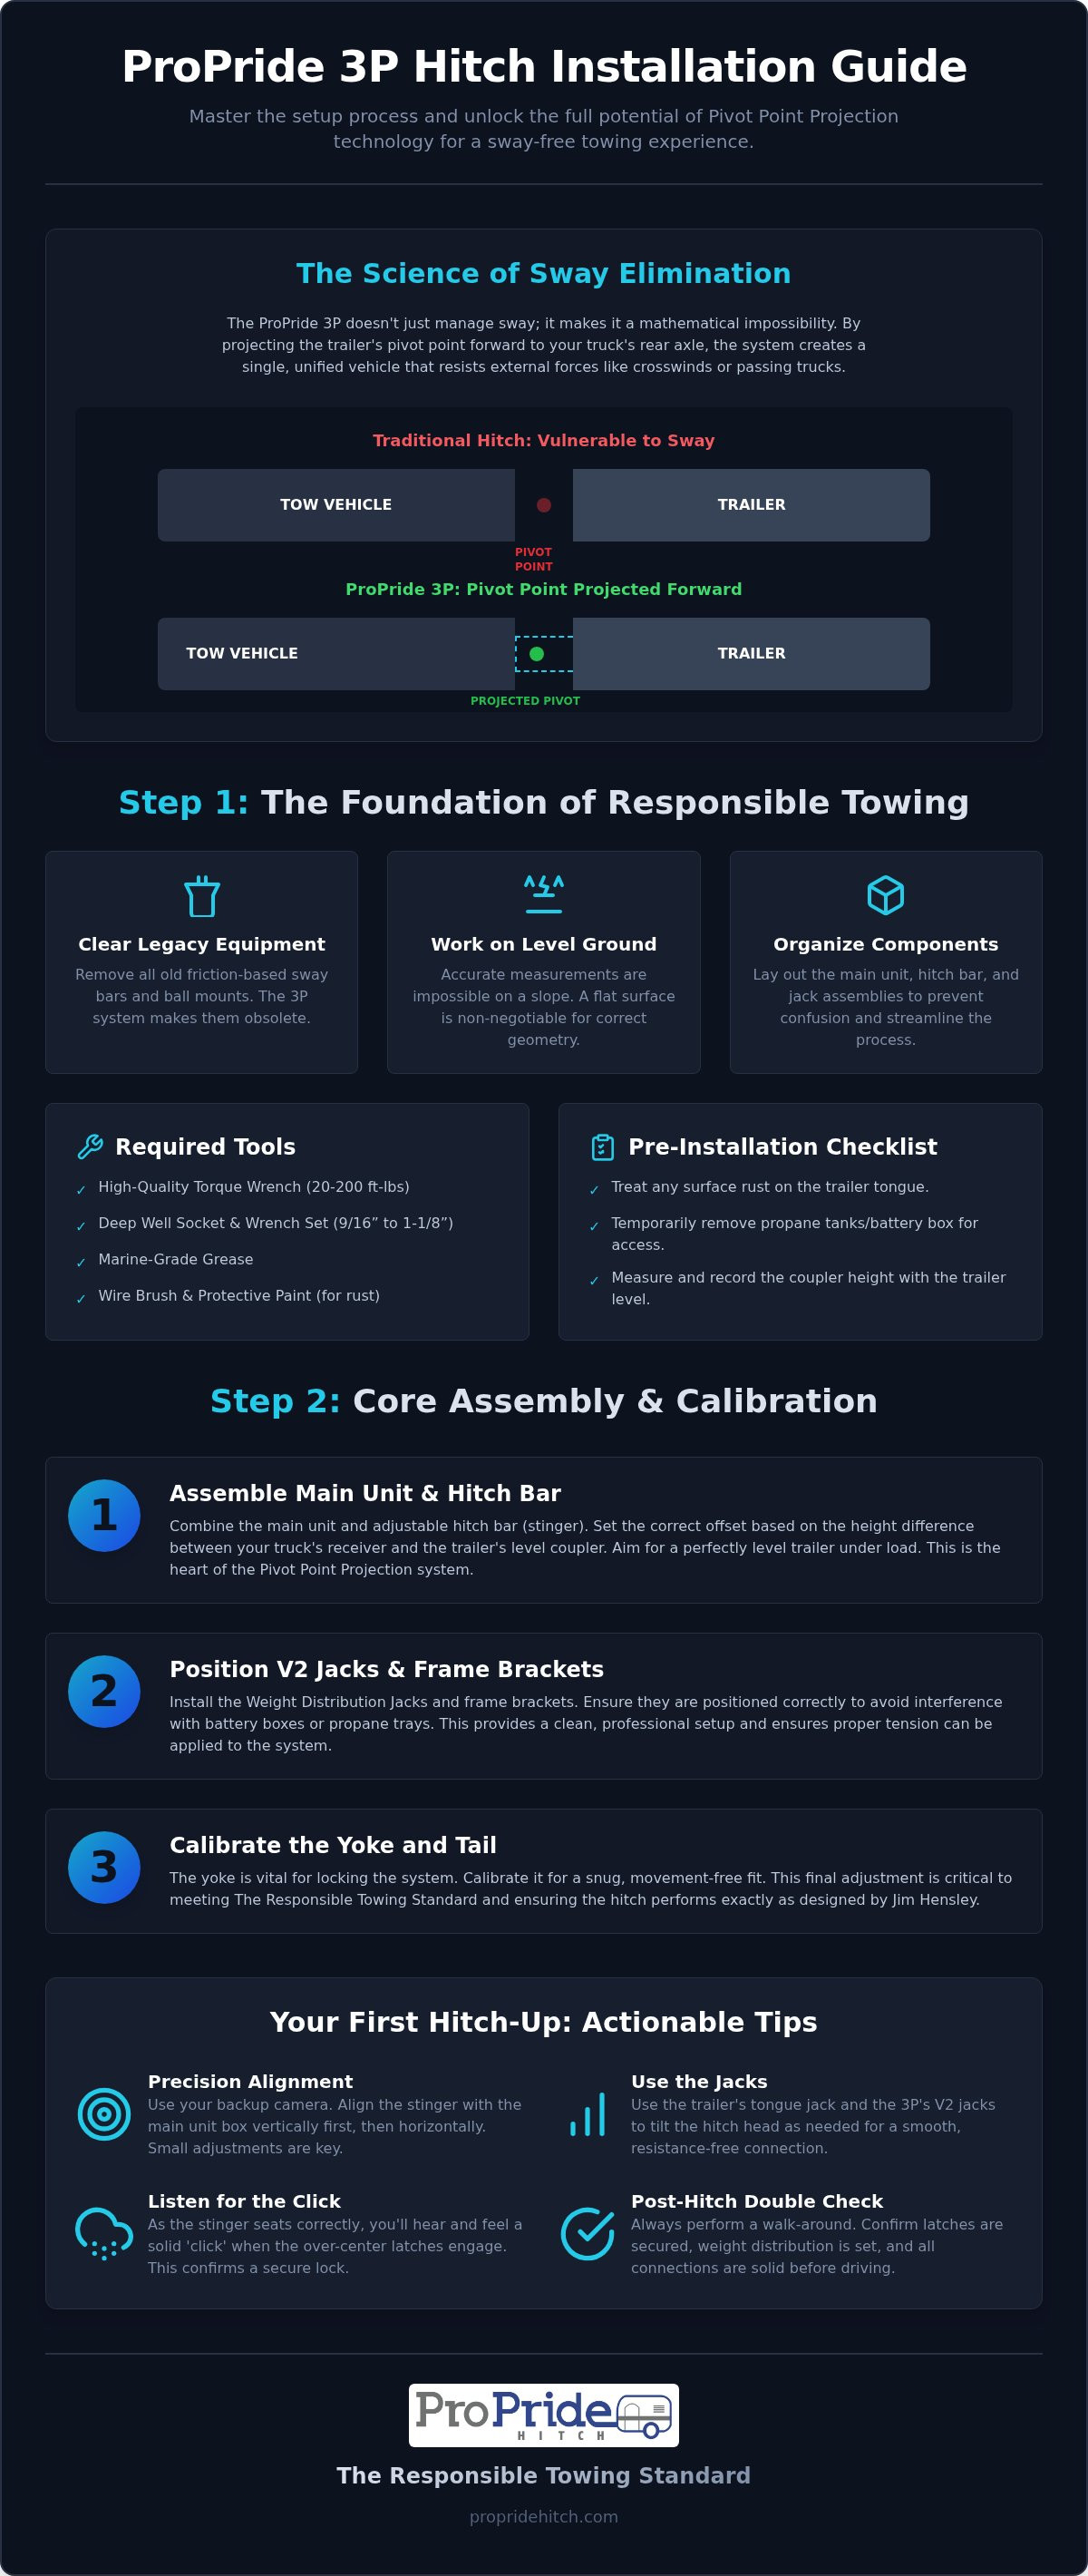
Installing a ProPride 3P isn't just another weekend project; it's a commitment to a higher level of safety on the road. Before you pick up a wrench, you must establish a workspace that reflects the precision of the equipment you're about to install. A clean, organized environment is essential because it allows you to focus entirely on the mechanical integrity of the system. You are moving beyond the limitations of a traditional weight-distributing hitch and stepping into a world of advanced engineering. This propride hitch installation guide begins with the "Level Ground" rule. You cannot get accurate measurements on a slope. Ensure your tow vehicle and trailer are on a flat, concrete or asphalt surface to guarantee the geometry of the Pivot Point Projection works exactly as intended.
To better understand how these components come together, watch this helpful video:
Start by clearing the slate. Remove all legacy friction-based sway bars or old ball mounts from your trailer tongue. These components are obsolete once you transition to the ProPride 3P Hitch. Lay out your components methodically: the heavy-duty main unit, the adjustable hitch bar, and the V2 jack assemblies. Organizing your parts now prevents confusion later and ensures you've met the Responsible Towing Standard from the very first bolt.
Required Tools for a Professional Install
Precision requires the right tools. You shouldn't guess when it comes to the safety of your family. You'll need a high-quality torque wrench capable of a range between 20 and 200 foot-pounds. This is non-negotiable for tightening critical safety bolts to the Jim Hensley design specifications. Additionally, gather a deep well socket set and open-ended wrenches in sizes from 9/16” to 1-1/8”. We also recommend having marine-grade grease on hand. Applying this to the moving parts during assembly ensures long-term performance and protects your investment from the elements.
Pre-Installation Trailer Maintenance
A professional installation looks at the trailer as a whole system. If you see surface rust on your trailer tongue, take the time to wire-brush it and apply a coat of protective paint. Mounting high-end hardware over rust compromises the bond and the longevity of the install. You'll also need to temporarily remove your propane tanks and potentially the battery box to ensure you have clear access to the trailer frame for the brackets. Finally, measure your trailer coupler height while the trailer is perfectly level. This baseline measurement is the key to achieving a perfectly level tow later in the process.
Installing the ProPride 3P Main Unit and Hitch Bar
Pivot Point Projection is the heartbeat of the ProPride 3P Hitch. It's a sophisticated engineering solution that uses heavy-duty 3/4-inch links to project the trailer's pivot point forward, positioning it near the rear axle of your tow vehicle. This mechanical convergence ensures that the trailer cannot force the truck to pivot on its own ball, which is the primary cause of dangerous sway. This propride hitch installation guide helps you calibrate this system for maximum stability, ensuring your setup meets the Responsible Towing Standard from the moment you pull out of your driveway.
Assembling the Adjustable Hitch Bar
The adjustable hitch bar, often called the stinger, is the heavy steel component that connects your truck's receiver to the main unit. You must determine the correct offset position based on the height difference between your truck's receiver and the trailer's level coupler. Aim for a configuration that keeps the trailer perfectly level while under load. Use the tilt feature to angle the head slightly toward the trailer; this helps pre-tension the system and improves weight distribution efficiency. Once you've found the sweet spot, use your torque wrench to tighten the bolts to the manufacturer's specific standards, which is typically 200 foot-pounds for these critical fasteners.
Mounting the Main Hitch Unit
Now, move your focus to the trailer. The main unit is the heavy assembly that remains attached to your trailer's A-frame. Lift the unit and slide the ball into the trailer's coupler. We advocate for the "Double Check" method: visually confirm the ball is fully seated before locking the coupler latch. It's a simple step, but it's central to achieving a professional-grade installation. You want a secure connection that doesn't put unnecessary stress on the trailer's built-in coupler components while maintaining the rigid connection required for the system to function.
Aligning the links is where the engineering truly comes to life. Ensure the 3/4-inch links are positioned so they can move freely through their intended arc. This movement is what allows the hitch to project that virtual pivot point forward. If you find yourself needing more technical specs on the 3P model for your specific trailer weight, you can always view the full product details to cross-reference your measurements. By taking the time to secure the main unit with precision, you are upholding the Jim Hensley design legacy and ensuring your setup qualifies as The Best Hitch on the Planet.
Weight Distribution Jacks and Frame Brackets
Once your main unit is seated, the next phase of this propride hitch installation guide focuses on the components that handle the heavy lifting: the weight distribution jacks and frame brackets. The V2 Weight Distribution Jacks represent a significant engineering evolution, offering a more fluid operation compared to older designs. These jacks allow you to fine-tune the tension on your spring bars with surgical precision. By adjusting the jack height, you're effectively shifting weight from the trailer's tongue back to the tow vehicle's front axle and the trailer's axles. This balance is critical for maintaining steering control and braking efficiency, embodying everything we mean by The Responsible Towing Standard.
Precision in your measurements here defines the quality of your towing experience. You must ensure symmetrical weight loading by measuring the distance from the jack to the bracket on both sides of the trailer frame. Even a slight discrepancy can lead to uneven weight distribution, which compromises the stability that the Jim Hensley design legacy is known for. A helpful tip is to use a high-visibility marker to note your ideal jack height once you've achieved a perfectly level tow; this makes future hook-ups much faster and more consistent.
Installing the V2 Jacks
Mount the V2 jacks onto the frame brackets with a focus on vertical alignment. If the jacks are tilted, you risk mechanical binding, which makes it much harder to adjust the weight distribution under load. Secure the spring bars to the jack assembly using the provided pins. Ensure the bars sit flush within the main unit's sockets. You want the system to feel like a single, rigid piece of machinery. If you encounter resistance while cranking the jacks, stop and check that the spring bars are properly seated. Don't force a component that isn't aligned correctly.
Frame Bracket Placement and Safety
Modern travel trailers often have crowded A-frames filled with battery boxes, propane trays, and storage racks. Finding the "sweet spot" for your frame brackets requires a bit of strategy. You may need to shift your propane tanks slightly forward or back to clear the necessary space. If space is exceptionally tight, look for brackets that allow for flexible mounting positions without compromising the structural integrity of the frame. Once the brackets are positioned, perform a final torque check on all hardware. These bolts must be tight enough to resist the immense leverage of the spring bars. By taking these extra steps, you ensure your ProPride 3P Hitch operates at peak performance, providing the ultimate peace of mind on the open road.
The ProPride 3P Yoke and Final Adjustments
The ProPride 3P Yoke is the structural anchor that makes our entire system possible. While traditional hitches allow the trailer coupler to pivot freely on the hitch ball, our design requires a rigid connection to function properly. This propride hitch installation guide emphasizes that the yoke’s primary job is to lock the main unit to the trailer frame. By doing so, it forces all lateral movement through the heavy-duty 3/4-inch links, which is the only way to achieve true Pivot Point Projection. When the yoke is correctly installed, the trailer and hitch become a single, unified mechanical arm. This is a critical component of The Responsible Towing Standard, as it ensures the laws of physics work in your favor rather than against you.
Setting the Yoke Tension
The yoke tail must be adjusted for a snug, movement-free fit against the trailer’s A-frame. You’ll need to calculate the correct distance for the yoke stop to ensure it doesn't shift during travel. A loose yoke is more than just a nuisance that causes audible "clunking"; it's a safety risk that compromises the entire anti-sway system. Before your first road test, perform a physical stress test. Try to move the main unit by hand. If there is any play between the coupler and the yoke tail, tighten the adjustment bolt further. Precision here is what separates a DIY job from a professional-grade installation that honors the Jim Hensley design legacy.
Fine-Tuning for the Road
With the yoke secure, your final task is to calibrate the weight distribution. Use the V2 jacks to adjust the tension on the spring bars until your tow vehicle returns to its original, unloaded height. This ensures a perfectly level tow, which is essential for proper headlight aim and braking traction. You should also check your clearance for tight turns. While the 3P system allows for impressive articulation, you must verify that your propane tanks or battery boxes don't interfere with the links at full lock. If you find the weight distribution isn't quite right after your first few miles, consult our guide on Adjusting Your ProPride 3P Weight Distribution for advanced calibration techniques.
A perfect install is a visual testament to engineering excellence. When you step back, the main unit should sit square, the spring bars should have a slight, symmetrical bow, and the trailer should sit perfectly parallel to the road. This setup provides the total elimination of sway and the ultimate peace of mind. If you are ready to experience the performance of The Best Hitch on the Planet for yourself, you can secure the ultimate towing setup today and start your next journey with absolute confidence.
The First Hitch-Up and Long-Term Maintenance
Completing your propride hitch installation guide is a significant milestone, but the true test of The Responsible Towing Standard begins when you first connect your truck to the trailer. Unlike traditional hitches where you drop a coupler onto a ball, the ProPride 3P uses a precision-fit stinger that slides into the main unit box. This connection creates the rigid link necessary for Pivot Point Projection to function correctly. Alignment is often the most common hurdle for new owners, but it quickly becomes second nature once you understand the mechanical relationship between the stinger and the hitch head. You aren't just hooking up a trailer; you're calibrating a precision instrument for the road ahead.
Safety isn't a one-time event. High-performance machinery requires a dedicated maintenance schedule to ensure lifelong reliability and the total elimination of sway. One of the most critical steps is re-torquing your bolts. After your first 100 miles on the road, the components will have settled under the immense stress of travel. You must check every bolt, particularly the frame brackets and the hitch bar fasteners, to ensure they haven't moved. This diligence is what separates a casual traveler from a responsible owner who values the Jim Hensley design legacy and the integrity of The Best Hitch on the Planet.
Hitching and Unhitching Tips
Achieving a perfect alignment on your first try is easier with a few professional secrets. Use the "O-Ring" trick: place a small rubber O-ring on your stinger to mark the exact depth where it fully seats in the main unit. This visual cue tells you exactly when you've backed up far enough. If the angles don't match, use your V2 jacks to tilt the main unit box up or down to match the stinger's angle. This adjustment allows the stinger to slide in without resistance. For a detailed breakdown of these mechanics, see our resource on How to Hitch and Unhitch The ProPride 3P.
Maintaining Your ProPride 3P
To keep your system performing at its peak, you must establish a routine. Grease the main unit zerk fittings every 1,000 miles using a high-quality marine-grade grease. This prevents internal friction and ensures the links move smoothly through their intended arc. Inspect your spring bars regularly for signs of wear or uneven tension. If you notice any issues, remember that your investment is protected by a Lifetime Warranty. This support isn't just a marketing claim; it's our commitment to your long-term safety and peace of mind. By following these maintenance steps, you ensure your equipment remains the ultimate engineering solution for every journey you take.
Mastering the Standard for a Safer Journey
By following this propride hitch installation guide, you've moved beyond the "good enough" mindset of traditional towing. You've learned that a professional-grade setup relies on the precision of the yoke, the calibration of the V2 jacks, and a commitment to a rigorous maintenance schedule. These steps ensure your trailer remains a stable extension of your tow vehicle. You aren't just a driver; you're a guardian of your family's safety on the road.
The ProPride 3P is more than just hardware; it's an engineering solution backed by our Patented Pivot Point Projection Technology and a Lifetime Warranty. It represents the pinnacle of stability, earning its title as The Best Hitch on the Planet. Now that you have the knowledge to install and maintain your system correctly, you can travel with the quiet confidence that only total sway elimination provides. Don't settle for anything less than absolute control.
Are you ready to experience a stress-free travel experience? Upgrade to The Responsible Towing Standard with the ProPride 3P® Hitch today. Your investment in safety is the most responsible decision you can make for your next adventure.
Frequently Asked Questions
How long does it typically take to install a ProPride 3P hitch?
Most owners complete the process in three to five hours. This timeframe assumes you have studied this propride hitch installation guide and have your tools organized beforehand. While a professional might finish faster, we encourage you to work methodically to ensure every bolt meets the Jim Hensley design specifications. Rushing compromises the precision required for Pivot Point Projection to function at its peak, so take the time needed for a perfect setup.
Do I need to drill into my trailer frame to install the ProPride 3P?
You don't need to drill into your trailer frame. The ProPride 3P utilizes heavy-duty bolt-on brackets that clamp securely to the A-frame. This design preserves the structural integrity of your trailer while providing a rock-solid foundation for the weight distribution jacks. It's a clean, professional approach that aligns with The Responsible Towing Standard, ensuring your investment remains unmodified while achieving a level of stability that traditional hitches simply cannot match.
Can I install the ProPride 3P hitch by myself, or do I need a second person?
You can install the system alone, but having a second person is highly recommended when mounting the main unit. This component is a substantial piece of precision engineering and can be heavy to lift into place while aligning the ball. A helper makes the process safer and more efficient, allowing you to focus on the fine-tuning and torque requirements that define a high-quality installation. Safety is always the priority when handling professional-grade towing equipment.
What is the most common mistake people make during ProPride installation?
The most frequent oversight is failing to properly tension the yoke. If the yoke isn't snug against the trailer frame, the system cannot lock the main unit into a rigid arm, which is required to project the pivot point forward. Another common error is skipping the initial measurements for the hitch bar tilt. Correcting these settings ensures you achieve the total elimination of sway that makes this The Best Hitch on the Planet.
Will the ProPride 3P work with my V-nose trailer or specific propane tank cover?
The 3P system is compatible with most V-nose trailers and propane covers, though space is often at a premium. You might need to shift propane trays or battery boxes slightly to clear the frame brackets. Because the V-nose design often limits clearance, measuring your frame space before you start is an essential part of the propride hitch installation guide. Precision placement ensures full articulation without any mechanical interference during tight turns.
How often should I check the torque on the hitch bolts after installation?
You should perform your first torque check after the initial 100 miles of towing. Components often settle under the dynamic stress of the road, and bolts may require minor tightening to return to their specific foot-pound requirements. After that initial check, we recommend a quick inspection every 1,000 miles. Maintaining these standards is part of a responsible maintenance schedule that ensures long-term safety and the mechanical durability of your hitch system.
What happens if my trailer isn't level after the initial installation?
If your trailer isn't level, you can easily adjust the offset on the adjustable hitch bar. By moving the head assembly up or down on the stinger, you can find the perfect height for your specific tow vehicle. Additionally, fine-tuning the V2 jacks will help distribute weight more effectively across all axles. Achieving a level trailer is critical for optimal aerodynamics and braking, fulfilling the core promise of The Responsible Towing Standard.