
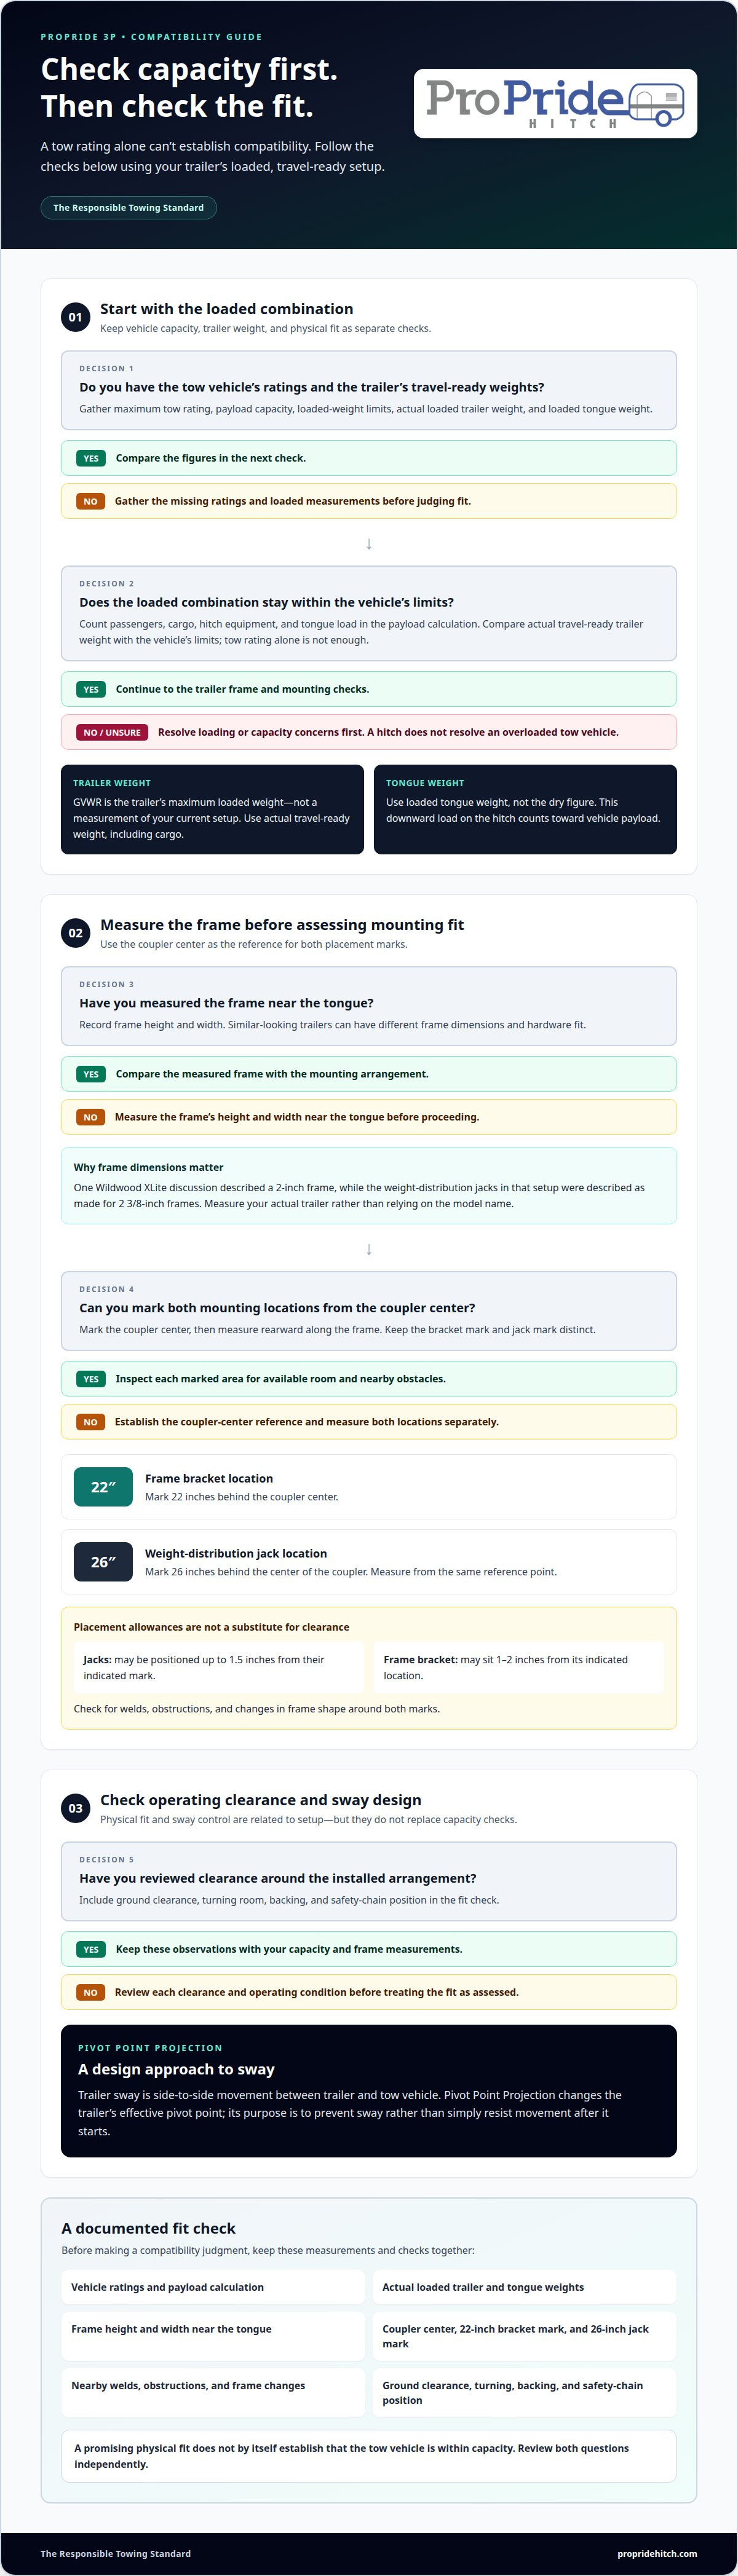
A tow rating alone can't establish fit. A sound assessment of ProPride 3P compatibility with your trailer considers more than whether your vehicle can pull its loaded weight: the vehicle’s capacity, loaded tongue weight, trailer-frame dimensions, mounting positions, and clearance all matter together.
It’s sensible to examine those details before choosing towing equipment. A hitch designed to address sway still has to attach correctly and work within the limits of the tow vehicle and trailer. Treating capacity and physical fit as separate checks helps you make a safer, better-informed decision.
This guide walks you through the specifications to gather, how to measure frame and hitch placement, and how the system’s pivot-point design affects sway control. Use your trailer’s loaded setup in your calculations rather than relying only on its empty figures. With each check laid out clearly, you can spot a promising fit, identify a measurement or clearance issue, and understand what to resolve before towing.
Key Takeaways
- Use the tow vehicle’s capacity and the trailer’s loaded weights to assess the combination, not tow rating alone.
- Measure the trailer frame and coupler area carefully to see whether the mounting locations can fit.
- Consider how Pivot Point Projection addresses trailer sway, while keeping vehicle and trailer limits in view.
- Gather vehicle ratings, loaded trailer weights, frame dimensions, and hitch-placement measurements before ordering.
- Assess ground clearance, turning room, backing, and safety-chain position as part of the fit check.
Tow vehicle and trailer specifications
- Start with the tow vehicle’s ratings. Record its maximum tow rating, payload capacity, and loaded weight limits from the vehicle information. Tow rating alone doesn’t establish a suitable match: passengers, cargo, and hitch equipment also use payload. A 2004 Ford Excursion example illustrates the difference. Its owner stated an 11,000-pound tow rating, yet an estimate found the vehicle about 325 pounds over payload with the trailer tongue weight and 575 pounds of occupants and miscellaneous items.
- Use the trailer’s loaded weight, not just its dry weight. Compare the gross vehicle weight rating (GVWR), the trailer’s maximum loaded weight, with its actual travel-ready weight. The GVWR is a limit, not a measure of your loaded setup. Include carried cargo, because it changes the weight the tow vehicle must handle.
- Separate dry tongue weight from loaded tongue weight. Tongue weight is the downward load the trailer puts on the hitch, and it counts toward the tow vehicle’s payload. Don’t use the dry figure as a substitute for a travel-ready measurement.
- Account for hitch equipment in the combined load. The tow vehicle carries the tongue load and other weight transferred through the hitch; equipment attached to the trailer also adds to its weight. Include the relevant equipment weights in your calculations.
- Compare every figure before judging fit. Keep the tow rating and payload calculation separate. A 2016 Ford F-150 4×4 appears in an installation example, but its presence doesn’t establish compatibility for other F-150 configurations or trailer combinations.
- Check route requirements before traveling. State and local towing rules can affect a setup, and requirements vary by jurisdiction. Identify the states and local areas on your route, then review the applicable rules for your vehicle and trailer combination before departure.
Trailer frame measurements and hitch placement
- Measure the trailer frame before assessing mounting fit. Use a tape measure to record the frame’s height and width near the tongue. A discussion involving a Wildwood XLite trailer described a 2-inch frame, while the weight-distribution jacks in that setup were described as made for 2 3/8-inch frames. That difference shows why a frame measurement matters: a similar-looking trailer frame may not match the hardware’s intended fit.
- Find the coupler center and use it as your reference. The coupler is the part that connects the trailer to the tow vehicle’s hitch. Mark its center, then measure along the trailer frame toward the rear. The installation instructions place the frame bracket location 22 inches behind the coupler center. Mark the point clearly on both sides, so you can compare the available space and identify nearby obstacles.
- Measure the weight-distribution jack position separately. The jack location is not the same as the frame bracket location. The instructions mark the weight-distribution jack 26 inches behind the center of the coupler. Measure from the same center reference each time. This avoids shifting the reference point and accidentally treating the 22-inch bracket mark as the jack mark.
- Check whether nearby components leave room for both locations. Inspect the frame around the 22-inch and 26-inch marks for welds, obstructions, or changes in frame shape. The weight-distribution jacks may be positioned up to 1.5 inches from their indicated mark. The frame bracket may sit 1-2 inches from its indicated location. Those allowances are placement ranges, not a reason to ignore frame clearance or alignment.
- Record the actual measurements, not just the trailer model. Write down the frame dimensions, coupler-center reference, bracket mark, and jack mark. A model name alone won’t show whether a particular trailer has the same frame size or component placement as another example. For instance, the 2-inch frame in the Wildwood XLite discussion differs from the 2 3/8-inch frame associated with the jacks.
- Use a measured layout to review the hitch arrangement. A paper sketch can show the coupler center, both mounting marks, and any frame features that affect placement. Keep the distances labeled, especially 22 inches and 26 inches, so the two locations remain distinct. For more detail on the system’s mounting arrangement, review these trailer hitch design details alongside your recorded frame measurements.
A hitch does not resolve an overloaded tow vehicle. Frame measurements and placement marks help assess physical fit, but they do not establish whether the vehicle is overloaded. Keep capacity and fit as separate questions when reviewing the hitch arrangement and trailer layout.
Keep the stated tongue weight in view during your installation review. Frame dimensions and mounting positions cannot replace a tongue-weight measurement. Recording fit measurements alongside the tongue-weight figure helps keep hitch placement and loading considerations distinct.
Trailer-sway elimination
- Identify what “sway elimination” means mechanically. Trailer sway is side-to-side movement that can develop between a trailer and tow vehicle. A hitch’s sway-control approach affects how that movement is addressed. Pivot Point Projection is a design concept that changes the trailer’s effective pivot point. Its purpose is to prevent sway rather than simply resist movement after it starts. Keep that distinction in mind when comparing hitch designs.
- Separate sway control from weight and fit checks. A sway-eliminating design does not change your vehicle’s payload rating or correct an unsuitable trailer-frame fit. Treat these as separate parts of the compatibility decision. For example, even a design intended to eliminate sway still needs mounting points that suit the trailer frame. A careful assessment considers the vehicle, trailer, hitch placement, and sway-control method together.
- Ask how the hitch manages the pivot point. With a conventional ball connection, the trailer articulates around the ball. Pivot Point Projection instead changes the effective pivot point, which is central to its sway-control approach. This is not the same as adding resistance to trailer movement. Understanding that difference helps you assess whether the hitch’s engineering matches your goal of addressing sway at its source.
- Assess the full towing combination, not one component alone. Sway behavior depends on how the tow vehicle, trailer, and hitch work together. Use the same travel-ready loading and vehicle setup as you did for your capacity checks. Then review whether the frame measurements and mounting positions suit the hitch. Sway control is one part of a responsible towing setup, not a substitute for compatible equipment.
- Set realistic expectations from user experience. Individual reports about sway control describe a particular towing setup, not a result guaranteed for every vehicle and trailer combination. Treat them as context, and base your decision on your trailer’s specifications, mounting layout, and the hitch’s Pivot Point Projection design.
- Connect sway performance with your compatibility review. A design intended to completely eliminate trailer sway addresses a specific towing concern, but it does not resolve an overloaded tow vehicle or poor physical fit. Keep those limits clear as you assess the setup. If your priority is preventing sway through Pivot Point Projection, evaluate that mechanism alongside the practical fit checks, rather than treating sway control as proof that every combination is suitable.
What measurements and information do I need before ordering a ProPride 3P?
- Prepare a complete vehicle identification and ratings sheet. Write down the tow vehicle’s make, model, year, and configuration, then record its tow rating and payload limit. Use figures for the exact vehicle version, since a rating for a different configuration may not apply. Note the source for each value so you can trace it when reviewing the complete towing combination.
- Describe the trailer in its travel-ready condition. Record its make, model, overall length, GVWR, and measured loaded weight. A JayCo 264BH example measures 29.5 feet from bumper to tongue and has a 6,000-pound GVWR. That example shows why model details and dimensions help distinguish one trailer layout from another. Use your own trailer’s figures, not another owner’s configuration.
- Record tongue weight with the loaded setup clearly identified. Note whether the value is dry, estimated, or measured with the trailer packed for travel. Include the hitch equipment and cargo present during measurement. A dry specification and a travel-ready reading describe different conditions, so record the measurement along with what was on board.
- Make a frame measurement record with a clear reference point. Record the frame dimensions near the tongue, the coupler-center reference, and the intended mounting locations. A sketch can show frame rails, welds, brackets, and other features that affect available space. Label the left and right sides, and use the same units for every measurement. Clear notes make the trailer’s layout easier to assess.
- Document the tow vehicle’s actual travel load. List passengers, cargo, and equipment carried in the vehicle, then keep that list with the rating sheet. For example, a family trip adds people and belongings that an empty vehicle does not carry. This record helps distinguish the published tow rating from the payload available in your real setup, and keeps assumptions visible during the final compatibility review.
- Organize the details into one pre-order packet. Combine vehicle ratings, trailer identification, loaded weights, frame measurements, and a labeled layout sketch. Add photos showing the trailer tongue and surrounding frame to give the measurements visual context. Check for missing units and unclear loading conditions. A complete record makes it easier to assess compatibility before buying a hitch.
What clearance, turning, backing, or maintenance issues should I consider with a ProPride 3P?
- Measure ground clearance with the trailer connected. Check the lowest hitch component on level pavement, then consider driveway entrances and uneven transitions. The stinger is the hitch bar that connects the hitch assembly to the tow vehicle’s receiver. One reported setup left the bottom of its adjustable stinger 4 inches above ground. That example isn’t a universal target. Measure your connected combination, since vehicle height, trailer position, and hitch adjustment affect clearance.
- Check safety-chain height after setup changes. Inspect the chains where they connect and make sure they don’t drag during normal travel. One installation discussion recommends keeping trailer safety chains higher than 6 inches off the ground after installation. Treat this as a practical clearance check, then consider how the chains move while turning or crossing an uneven surface. Recheck them after changing hitch or trailer height.
- Plan for the trailer’s raised position. A reported trailer sat 3 inches higher, which prevented reversing the stinger mounting as suggested in that setup. This shows how a height change can affect adjustment options, not just ground clearance. Compare the connected trailer and tow-vehicle heights before choosing the stinger position. Include the hitch assembly’s lowest point in that clearance assessment.
- Assess turning room in a controlled area. One author says the hitch may allow a turn of 87 degrees. Treat that figure as a reported capability, not a promise for every combination. Trailer shape, vehicle geometry, and nearby obstacles affect usable turning space. Begin slowly in an open area and watch the trailer, hitch, and tow vehicle throughout the turn. Stop if any part approaches an obstacle.
- Practice backing before entering a tight site. Choose an open, level area and make gradual steering inputs while a spotter watches clearances. Observe how the stinger and trailer move as the vehicle changes direction. A raised trailer or different mounting arrangement can change what you see. Don’t use a reported turning angle alone to judge backing space, especially near posts or other obstacles.
- Build a repeatable pre-trip inspection. Before each trip, check visible hitch connections, trailer-frame attachment areas, chains, and clearance points. Inspect them again after driving over uneven ground or making an adjustment. Follow the hitch instructions for maintenance details and intervals instead of guessing at a schedule or using generic tightening values. A consistent check helps you notice changes before setting out.
ProPride
ProPride may be an option if your vehicle ratings, trailer weights, frame measurements, and clearance checks support the combination. The ProPride 3P Hitch uses patented Pivot Point Projection technology as part of its sway-control design; it is not a guarantee that trailer sway will be completely eliminated. The Responsible Towing Standard reflects the care this decision deserves. The design doesn’t increase a tow vehicle’s capacity or resolve a physical fit issue.
If you’re weighing your measurements against the hitch’s design, review your setup and the points that still need clarification. Responsible towing depends on matching equipment to the complete vehicle-and-trailer combination. Contact ProPride to discuss your setup.
Make Your Next Towing Decision With Confidence
Your towing setup can change when you carry different cargo or update your vehicle. Keep your compatibility notes with your towing records, and review them whenever the combination changes. Future decisions will then be based on current information rather than assumptions.
As you assess whether ProPride 3P is compatible with your trailer, remember that sound equipment choices begin with a suitable vehicle-and-trailer match. ProPride offers the ProPride 3P Hitch for drivers considering a sway-focused hitch design. Your measurements and setup details give you a practical starting point for deciding whether it aligns with your towing needs.
Contact ProPride about your setup and take your next step toward a more informed towing decision.
Frequently Asked Questions
How do I determine whether a ProPride 3P hitch is compatible with my trailer?
To assess ProPride 3P compatibility with your trailer, compare your loaded towing setup with the hitch’s mounting requirements and capacity options. Gather your trailer’s frame and A-frame details, coupler position, loaded tongue weight, and your tow vehicle’s ratings. Then consider turning and ground clearance. A trailer’s brand or model alone can’t establish fit, since frame layout and loading may differ between individual trailers.
What trailer weight and tongue-weight ratings does the ProPride 3P support?
The ProPride 3P Hitch is available in 600 lb, 800 lb, 1000 lb, and 1400 lb capacity options. These are hitch capacity options, not trailer gross-weight ratings. Trailer GVWR describes the maximum loaded trailer weight, while tongue weight is the downward load at the hitch. Compare your actual loaded tongue weight with the appropriate hitch capacity, and assess the vehicle’s ratings separately.
What are the ProPride 3P hitch dimensions, shank sizes, and receiver requirements?
Use the current product specifications and your tow vehicle’s receiver information to match dimensions, shank configuration, and receiver limits. Don’t select a shank by appearance alone: its dimensions and adjustment must work with the vehicle and trailer heights. Also account for the receiver’s own rating when assessing the complete combination. The hitch’s adjustable bar accommodates different heights, but the setup still needs a suitable receiver and fit.
How do I check ProPride 3P compatibility with my tow vehicle and receiver rating?
Check the tow vehicle and receiver ratings for your exact vehicle configuration, then compare them with the loaded trailer and hitch setup. Include passengers, cargo, and equipment when assessing vehicle payload. The receiver is a separate part of the load path, so its rating matters alongside the vehicle’s tow and payload limits. A high tow rating alone doesn’t establish that every part of the combination is suitable.
Does the ProPride 3P fit my trailer frame, coupler, and A-frame dimensions?
Fit depends on the actual frame dimensions and available mounting area around the coupler and A-frame, not just the trailer’s make. Measure the frame and note welds or other features that could affect placement. The ProPride 3P Hitch is designed for no-drill installation, so don’t assume a frame requiring drilling is a suitable match. Compare your trailer layout with the hitch’s installation requirements before proceeding.