
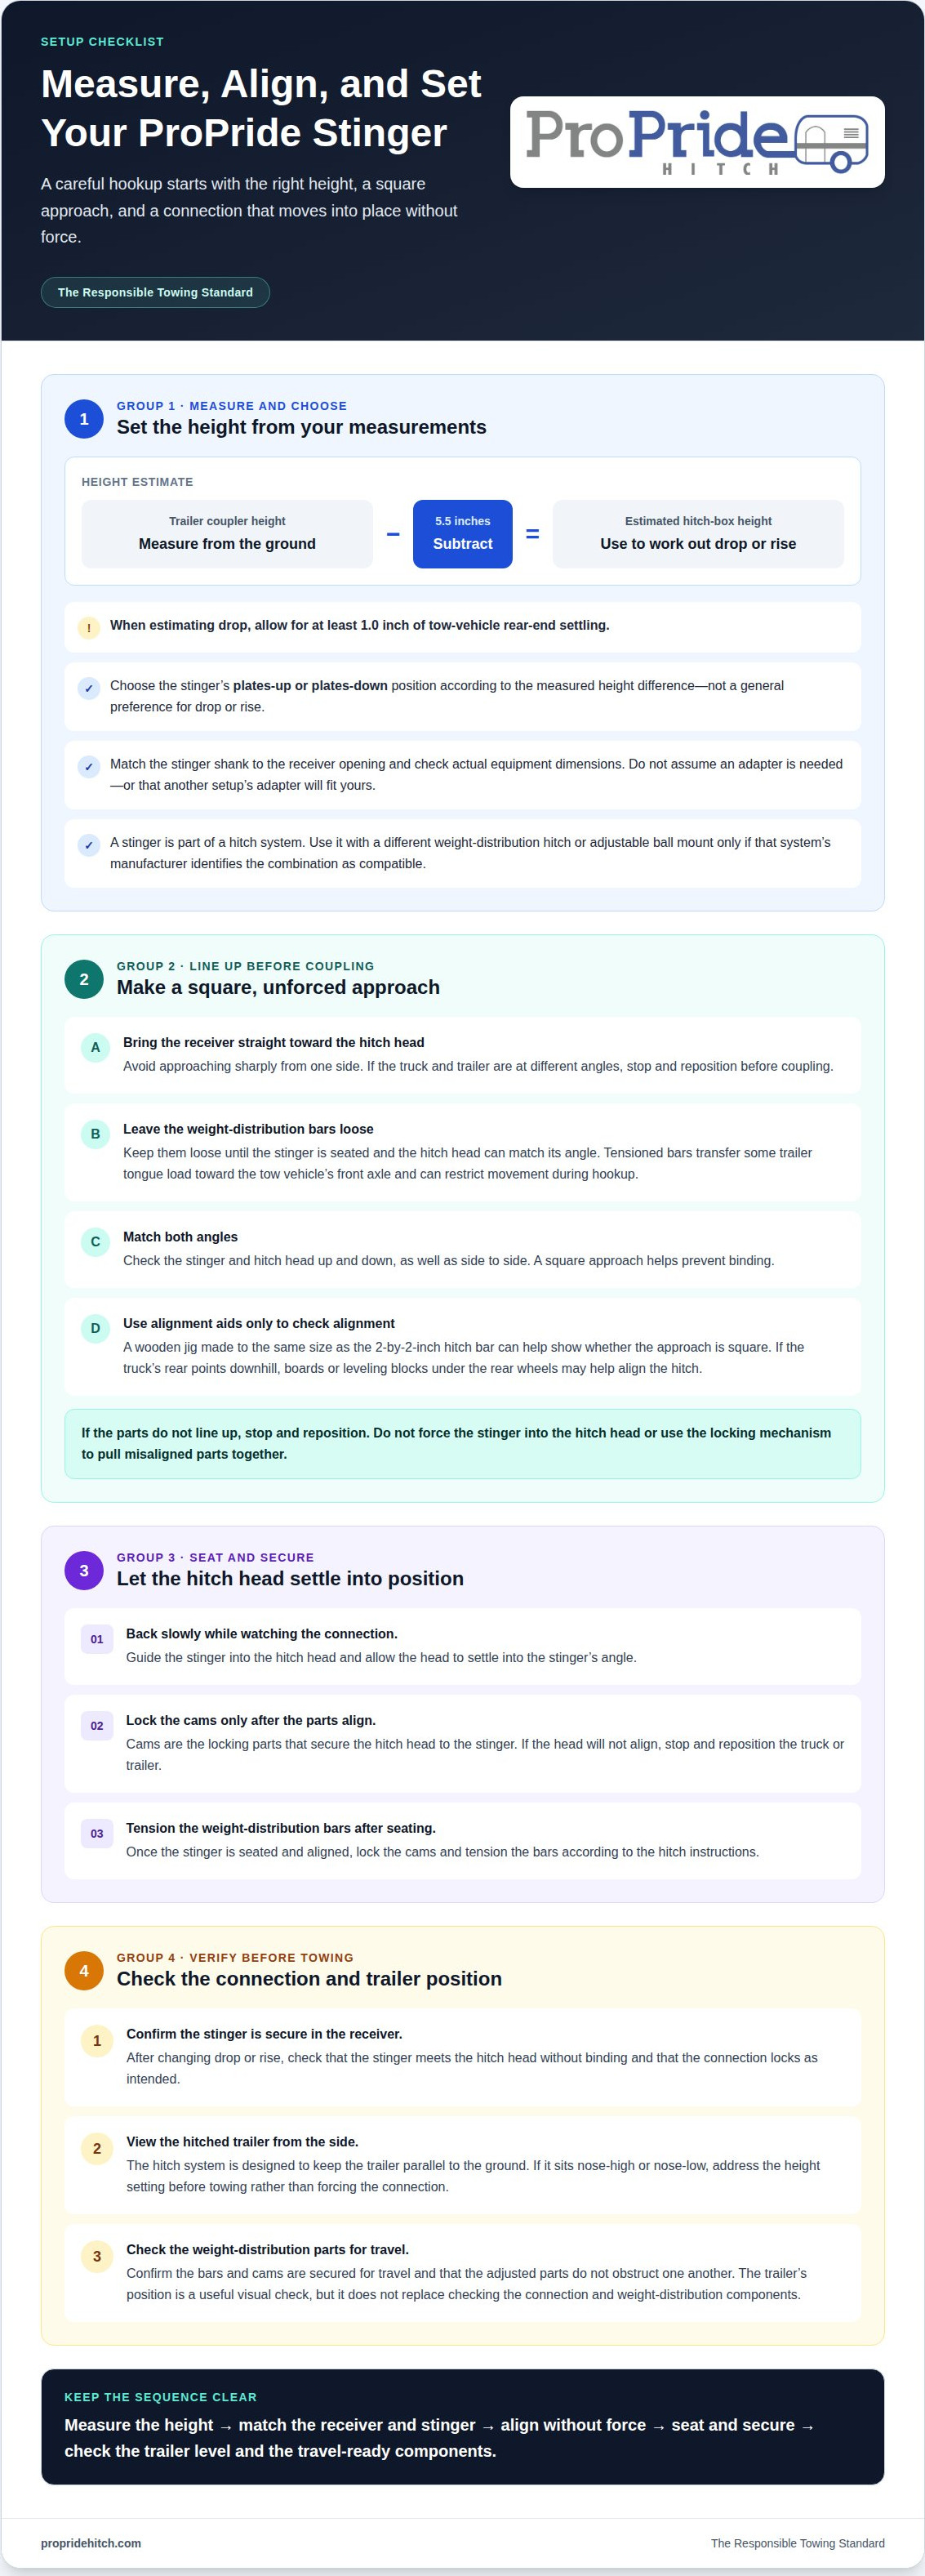
The right stinger height comes from measurements, not guesswork. A clear explanation of ProPride stinger drop and rise starts with subtracting 5.5 inches from the trailer coupler height to estimate the hitch-box height used to calculate the needed drop or rise. When estimating drop, allow for at least 1.0 inch of tow-vehicle rear-end settling.
Getting the height right is only part of a clean hookup. The stinger and hitch head also need to meet at compatible vertical and side-to-side angles, without the weight-distribution bars restricting movement. This guide explains how to align the stinger with the hitch head, set the hitch height, and check that the trailer sits level with the weight-distribution system engaged.
Key Takeaways
- Measure the trailer coupler height and use the hitch-box measurement to work out the required drop or rise.
- Allow for rear-end settling when estimating hitch height, then check how the trailer sits once connected.
- Keep the weight-distribution bars loose during hookup so the hitch head can align with the stinger.
- Match the stinger and receiver angles from side to side and up and down to help prevent binding.
- Choose the hitch bar’s plates-up or plates-down position based on the height difference for your setup.
Connecting the truck and trailer
- Line up the truck and trailer. Position the truck so its receiver approaches the trailer’s hitch head straight on, not sharply from one side. A straight approach makes it easier to see whether the stinger and hitch head align. If the truck and trailer are at different angles, stop and reposition them before coupling. Bring the parts together without forcing the stinger into the hitch head.
- Confirm the receiver fit before coupling. Match the stinger to the truck’s receiver and any required draw tube adapter, a tube that fits between the receiver and the hitch assembly. Receiver sizes can differ: one reported setup used a 2.5-inch receiver, while a 2020 Ford F-250 Super Duty setup required a 3-inch draw tube adapter. Those examples aren’t universal specifications. Check the actual receiver and stinger dimensions for your equipment, and don’t assume an adapter is needed just because another truck uses one.
- Leave the weight-distribution bars loose. Before backing the truck toward the hitch head, release the bars so they don’t resist alignment. When tensioned, the bars transfer some trailer tongue load toward the tow vehicle’s front axle. During hookup, that tension can restrict movement and make connecting harder. Keep the bars loose until the stinger is seated and the hitch head can match its angle.
- Guide the stinger into the hitch head without forcing it. Back the truck slowly while watching the connection. Let the hitch head settle into the stinger’s angle before locking the cams, the locking parts that secure the hitch head to the stinger. If the head won’t align, stop and reposition the truck or trailer instead of using the locking mechanism to pull the parts together. A slow, controlled approach makes it easier to see whether the stinger enters cleanly and the hitch head sits square.
- Complete the connection, then check the trailer’s position. Once the stinger is seated and aligned, lock the cams and tension the weight-distribution bars according to the hitch instructions. The hitch bar assembly is designed to keep the hitched trailer parallel to the ground, ready for towing. Check the trailer from the side. If it sits nose-high or nose-low, address the height setting before towing rather than forcing the connection.
- Unhitch in a controlled sequence. Once parked, support the trailer with its tongue jack before disconnecting. One method is to lower the jack pad until it just touches the ground, then lower the towers, the supports that hold the weight-distribution bars, until the bars move freely before releasing the cams. Another method leaves the towers set with the load and lowers the jack pad to the ground without transferring weight to it. These methods differ, so follow the instructions for your hitch rather than combining their steps.
ProPride stinger and receiver alignment
Match the stinger and receiver before coupling, checking both height and side-to-side angle. Approaching square helps prevent binding during hookup.
-
Compare Drop and Rise Options
Compare the required height change with the stinger’s available orientations before choosing a setup. Drop and rise describe whether the connection needs to sit lower or higher relative to the truck receiver. A stinger can be set in plates-up or plates-down positions; an adjustable ball mount changes the ball’s position through its own adjustment. Don’t assume these systems adjust in the same way or are compatible.
For a 2-inch receiver, use a stinger shank made for that receiver opening. Match the receiver and shank dimensions before insertion; a reported 2.5-inch receiver setup doesn’t establish a fit for a 2-inch receiver.
-
Install or Flip the Stinger
Choose the plates-up or plates-down position that matches the measured height difference, then secure the stinger in the receiver. The right position depends on the truck and trailer measurements, not a general preference for drop or rise. Keep the components in their intended orientation, and don’t force a part into place if its dimensions or alignment don’t match.
A stinger is part of a hitch system, so don’t assume it works with a different weight-distribution hitch. Use it with another system only if that system’s manufacturer identifies the combination as compatible. The same caution applies to substituting an adjustable ball mount.
-
Align the Stinger and Receiver
Line up the truck and trailer so the receiver approaches the stinger without a sharp sideways angle. The hitch head and stinger need matching up-and-down and side-to-side angles to avoid binding. A wooden alignment jig made to the same size as the 2-by-2-inch hitch bar can help show whether the approach is square.
If the truck’s rear points downhill, placing boards or leveling blocks under the rear wheels may help align the hitch. Move slowly and check the angle again. Don’t use the hitch components to pull misaligned parts together.
-
Check Safety After Adjustment
After changing the drop or rise, confirm that the stinger sits securely in the receiver and meets the hitch head without binding. Check that the connection locks as intended, then view the hitched trailer from the side. Its position is a useful visual check, but it doesn’t replace checking the connection and weight-distribution components.
Before towing, confirm that the weight-distribution bars and cams are secured for travel and that the adjusted parts don’t obstruct one another. For a closer look at the complete trailer hitch system design, review how the hitch components work together.
Setting weight-distribution height
- Measure the trailer coupler and calculate the hitch-box height. With the trailer positioned for measurement, record the coupler height from the ground. Subtract 5.5 inches to estimate the hitch-box height, the height of the hitch’s square receiver opening, measured from the ground. For example, if your coupler measurement is 18 inches, the resulting hitch-box measurement is 12.5 inches. Use the same level ground reference for both measurements, or the comparison won’t be meaningful.
- Allow for the truck’s rear-end settling. The ProPride manual advises allowing for at least 1.0 inch of tow-vehicle rear-end settling when estimating the required hitch drop. The truck’s rear can sit lower after the trailer is connected, so measuring an unloaded truck alone may understate the drop needed. Include that settling allowance in your estimate before selecting the hitch-bar position. Then assess the connected setup rather than relying only on the initial calculation.
- Choose the hitch-bar position from the measured difference. Compare the tow-vehicle measurement with the calculated hitch-box height, then select a plates-up or plates-down configuration that matches the difference. For example, the plates-down configuration covers a 6.5-to-7.5-inch difference between those measurements. That range is a configuration reference, not a universal setting for every truck and trailer. Use your own measurements to choose the appropriate position.
- Set the weight-distribution jacks within their working height. Raise the trailer and truck as needed to tension the weight-distribution bars, while keeping the jacks at 8 inches or lower. If the jacks need to rise higher than 8 inches, the manual says to consider adding washers to the adjustable hitch-bar tilt pin. Make the adjustment in the specified manner, then reassess jack height before proceeding. Don’t treat extra jack travel as a substitute for setting the hitch geometry correctly.
- Correct the trailer attitude in small steps. If the trailer sits 2 inches lower at the front than at the rear, adjust an adjustable hitch bar that moves in 1-inch increments. For the specified troubleshooting adjustment, raise the hitch in 0.5-to-1-inch increments, then recheck the trailer’s position. When the tow vehicle’s rear points uphill relative to level, tightening the weight-distribution bars tips the hitch socket downward; raising the trailer tongue may also help alignment. Make one adjustment at a time so its effect is clear.
- Check the setup again with the trailer connected. Compare the trailer’s front and rear heights after tensioning the bars, and note the resulting jack position. Aim for a suitable connected position rather than copying a measurement from another rig. If the adjustment changes the trailer’s angle, review the height measurements and configuration before towing.
The author typically raises the trailer and the rear of the truck about 6 inches before tensioning the weight-distribution bars. An Airstream owner estimated that the ideal drop for their setup would be between 4 and 6 inches, illustrating why the final position should be based on the specific setup.
How do you install or flip a ProPride stinger for drop versus rise?
- Measure before choosing an orientation. First compare the tow vehicle and hitch-box measurements. Determine whether the setup needs drop or rise, then record the difference. Plates-up and plates-down positions correspond to specific ranges, so don’t flip the stinger based on appearance alone. Keep the measurements handy while selecting a configuration.
- Match plates-up positions to their listed ranges. The listed plates-up configurations cover a 0 to 1-inch difference, a 1-to-2.5-inch difference, and a 3.5-to-4.5-inch difference between the tow-vehicle and hitch-box measurements. Match your recorded measurement to the applicable range. These are distinct configurations, not a general rule that plates-up always creates the same amount of rise.
- Match plates-down positions to their listed ranges. The ProPride hitch bar has a plates-down configuration for a 4.5-to-5.5-inch difference. Another listed configuration gives plates-down for a 1-to-2.5-inch difference. Because ranges can meet or overlap, use the entry that applies to your particular setup instead of guessing from orientation alone.
- Keep trailer-rise settings distinct. For trailer rise, the manual lists plates down for a 0-to-1-inch difference and plates up for a 4.5-to-5.5-inch difference. It also lists plates down for a 2.5-to-3.5-inch difference and plates up for a 5.5-to-6.5-inch difference. To understand how ProPride stinger drop and rise work in practice, match your measurement to the relevant configuration instead of combining separate setup descriptions.
- Move the stinger without shifting other components. One owner described moving only the stinger, while the other heavy hitch components stayed in place. Treat this as a practical example, not a reason to force a part or improvise a fit. Choose the orientation that matches your measurements and make sure the stinger seats correctly in the receiver.
- Check the connected setup before towing. After installing the stinger, connect the trailer and assess its position. If it doesn’t match the intended setup, compare your measurements with the applicable configuration again. Don’t force the connection or choose an orientation outside the relevant range to correct a mismatch. A careful recheck helps confirm that the selected drop or rise suits the measured combination.
How much adjustment range do ProPride stingers provide?
- Read the ranges as configurations, not one universal adjustment. Each listed trailer-rise setting pairs a height difference with a plates-up or plates-down orientation. The difference is based on the tow-vehicle and hitch-box measurements. Match your measurements to the listed configuration. Some ranges meet or overlap, so don’t assume one orientation applies to every drop or rise.
- Check the plates-down entries for smaller differences. The manual lists trailer-rise configurations with plates down for 0-to-1-inch, 1-to-2.5-inch, 2.5-to-3.5-inch, and 3.5-to-4.5-inch differences. Compare your measurement with each stated range. These entries describe specific configurations, not a promise that every hitch position fits every vehicle and trailer combination.
- Review the plates-up entries separately. For trailer rise, the manual lists plates up for a 4.5-to-5.5-inch difference and a 5.5-to-6.5-inch difference. These ranges meet the listed plates-down range at 4.5 inches and 5.5 inches. At a boundary, follow the configuration that applies to your particular setup rather than choosing an orientation by appearance.
- Keep trailer-rise ranges distinct from other configurations. A plates-up or plates-down position can correspond to different measurements in another setup. For example, a general hitch-bar configuration lists plates down for a 6.5-to-7.5-inch difference, while the listed trailer-rise entries end at 6.5 inches. Don’t combine separate configuration descriptions into one chart.
- Use your measurement to determine whether a listed range fits. Compare the tow-vehicle measurement with the hitch-box measurement, then locate the corresponding interval and plate orientation. The trailer-rise entries cover differences from 0 to 6.5 inches across several settings. That span doesn’t mean every intermediate position uses the same orientation. Select the configuration that matches your measurement rather than relying on a broad range alone.
- Reassess the connected setup after choosing a range. Install the stinger, connect the trailer, and inspect its position before towing. If the result doesn’t suit the intended setup, review your measurements and compare them with the listed ranges. Don’t force the connection or choose an orientation outside the applicable configuration to compensate for a mismatch.
When hitching at a different angle, observe the stinger’s vertical and side-to-side angles. With the stinger in the hitch head, you can approximately mirror those angles by adjusting the weight-distribution jacks. Treat this as a way to reproduce the observed angles, not as a substitute for matching the measured height difference to the applicable configuration. The angle comparison concerns the stinger’s position in the hitch head; the listed trailer-rise ranges still specify the relevant plate orientation and measurement interval. Keep these checks separate: first identify the range that fits the measurements, then consider whether to approximately mirror the observed angles with the jacks. Mirroring an angle doesn’t change the endpoints of a listed range.
ProPride
ProPride helps drivers match hitch setup to their truck and trailer through the ProPride 3P Hitch, which uses patented Pivot Point Projection technology to eliminate trailer sway. Accurate stinger height and receiver alignment remain essential parts of a responsible towing setup, alongside the hitch’s sway-control design.
If your measurements don’t match a listed configuration, or the stinger won’t align without force, pause before towing. Review the setup details and how the hitch components work together so you can base the adjustment on the equipment and measurements involved. For help with your ProPride hitch setup, contact ProPride.
Make Your Next Hookup More Predictable
A reliable setup is one you can reproduce, not one that works by chance. Keep a simple record of the truck, trailer, and hitch configuration that suits your combination. If you change vehicles or make a substantial adjustment, revisit your notes and reassess the setup before towing. This makes careful preparation a repeatable part of your travel routine.
Understanding ProPride stinger drop and rise helps you make decisions based on measurements, not guesswork. If a connection still feels forced or the setup is difficult to interpret, pause and get guidance before setting out. It’s safer to address a mismatch deliberately than to try to correct it on the road.
Contact ProPride for hitching help and take the next step toward a setup you can approach with confidence.
Frequently Asked Questions
What is the correct ProPride stinger height for a level travel trailer?
There’s no universal stinger height. The right setting leaves the trailer parallel to the ground when hitched and ready to tow. Base the adjustment on your truck and trailer measurements, then assess the connected setup with weight distribution engaged. For example, if the trailer sits nose-high after hookup, review the stinger configuration rather than assuming the unloaded measurements determine its final position.