
Start with the essentials: a tire-pressure gauge and portable air compressor, roadside and first-aid kits, a fire extinguisher, wheel chocks, and leveling blocks. Essential travel trailer safety equipment also includes working smoke and carbon monoxide alarms and a plan for annual weight and safety checks. Check tire pressure before travel, secure the trailer before setup, and keep emergency gear easy to reach.
Careful preparation matters before a first trip, but a long checklist can obscure what matters most. Prioritize equipment that helps you spot tire trouble, stay visible during a roadside stop, respond to fire or injury, and set up the trailer securely.
This guide explains what to pack and how to use key items, then covers practical setup checks and an annual review of weight, tires, alarms, and other safety equipment. Use it as a clear starting point for preparing your trailer and keeping safety routines manageable from season to season.
Key Takeaways
- Use a tire-pressure gauge before travel, and keep a portable compressor on hand so you can address pressure needs safely.
- Pack roadside warning gear, a first-aid kit, and a flashlight where you can reach them quickly in an emergency.
- Inspect your fire extinguisher and test your smoke and carbon monoxide alarms as part of your regular safety routine.
- Chock the wheels before setup, then use leveling blocks to create a stable campsite position.
- Make an annual review of trailer weight, tires, alarms, and safety equipment part of your travel preparation.
1. Tire pressure gauges and portable air compressors
A tire gauge and portable air compressor belong in a travel trailer’s roadside kit. Check tire pressure before each trip, using the pressure recommended for your tires and load. A dial-type gauge with a 0 to 100 psi range gives you a clear reading across common RV tire pressures. Keep it somewhere accessible, not buried beneath camping gear. If the gauge shows a tire needs air, use a compressor suited to the tire’s pressure needs, then measure again with the gauge. Don’t rely on a visual glance; a tire can look normal while its pressure is low.
A tire-pressure monitoring system, or TPMS, adds another layer of information while traveling. It can monitor individual tires on the trailer and tow vehicle, alerting you to slow leaks or heat buildup before a tire fails. Set it up according to the instructions and respond promptly to alerts by stopping somewhere safe. Road flares can make a roadside stop more visible, but place them only when conditions allow you to do so safely.
Water and electrical equipment also deserve a place in your setup kit. Pack a drinking-water hose at least 25 feet long, plus an inline water filter to reduce sediment entering the trailer’s plumbing. A pressure regulator helps control incoming water pressure; travel-trailer regulators are generally set within 40 to 60 psi, depending on the trailer’s age and plumbing. Follow the regulator’s instructions and the needs of your trailer rather than assuming every system uses the same setting. For electrical hookups, use a surge protector to help limit damaging changes in electrical flow. Match any extension cord to the trailer’s amperage.
Which smoke, carbon monoxide, and propane detectors are required or recommended in travel trailers? Smoke and carbon monoxide detectors are recommended, and propane alarms are part of a careful safety setup. Test alarms monthly, replace their batteries semi-annually, and use a propane gas stop designed to cut off gas flow if it detects a leak.
Make the checks repeatable: inspect tires while cold before departure, compare each reading with the tire’s recommended pressure, and check again after adding air. Store the gauge and compressor together with the TPMS instructions and spare alarm batteries. At the campsite, connect the water filter and regulator before attaching the drinking-water hose to the trailer. Keeping tools and steps together makes it easier to catch pressure problems before they cause a roadside delay, while supporting safe travel and campsite comfort.
2. Roadside emergency and first aid kits
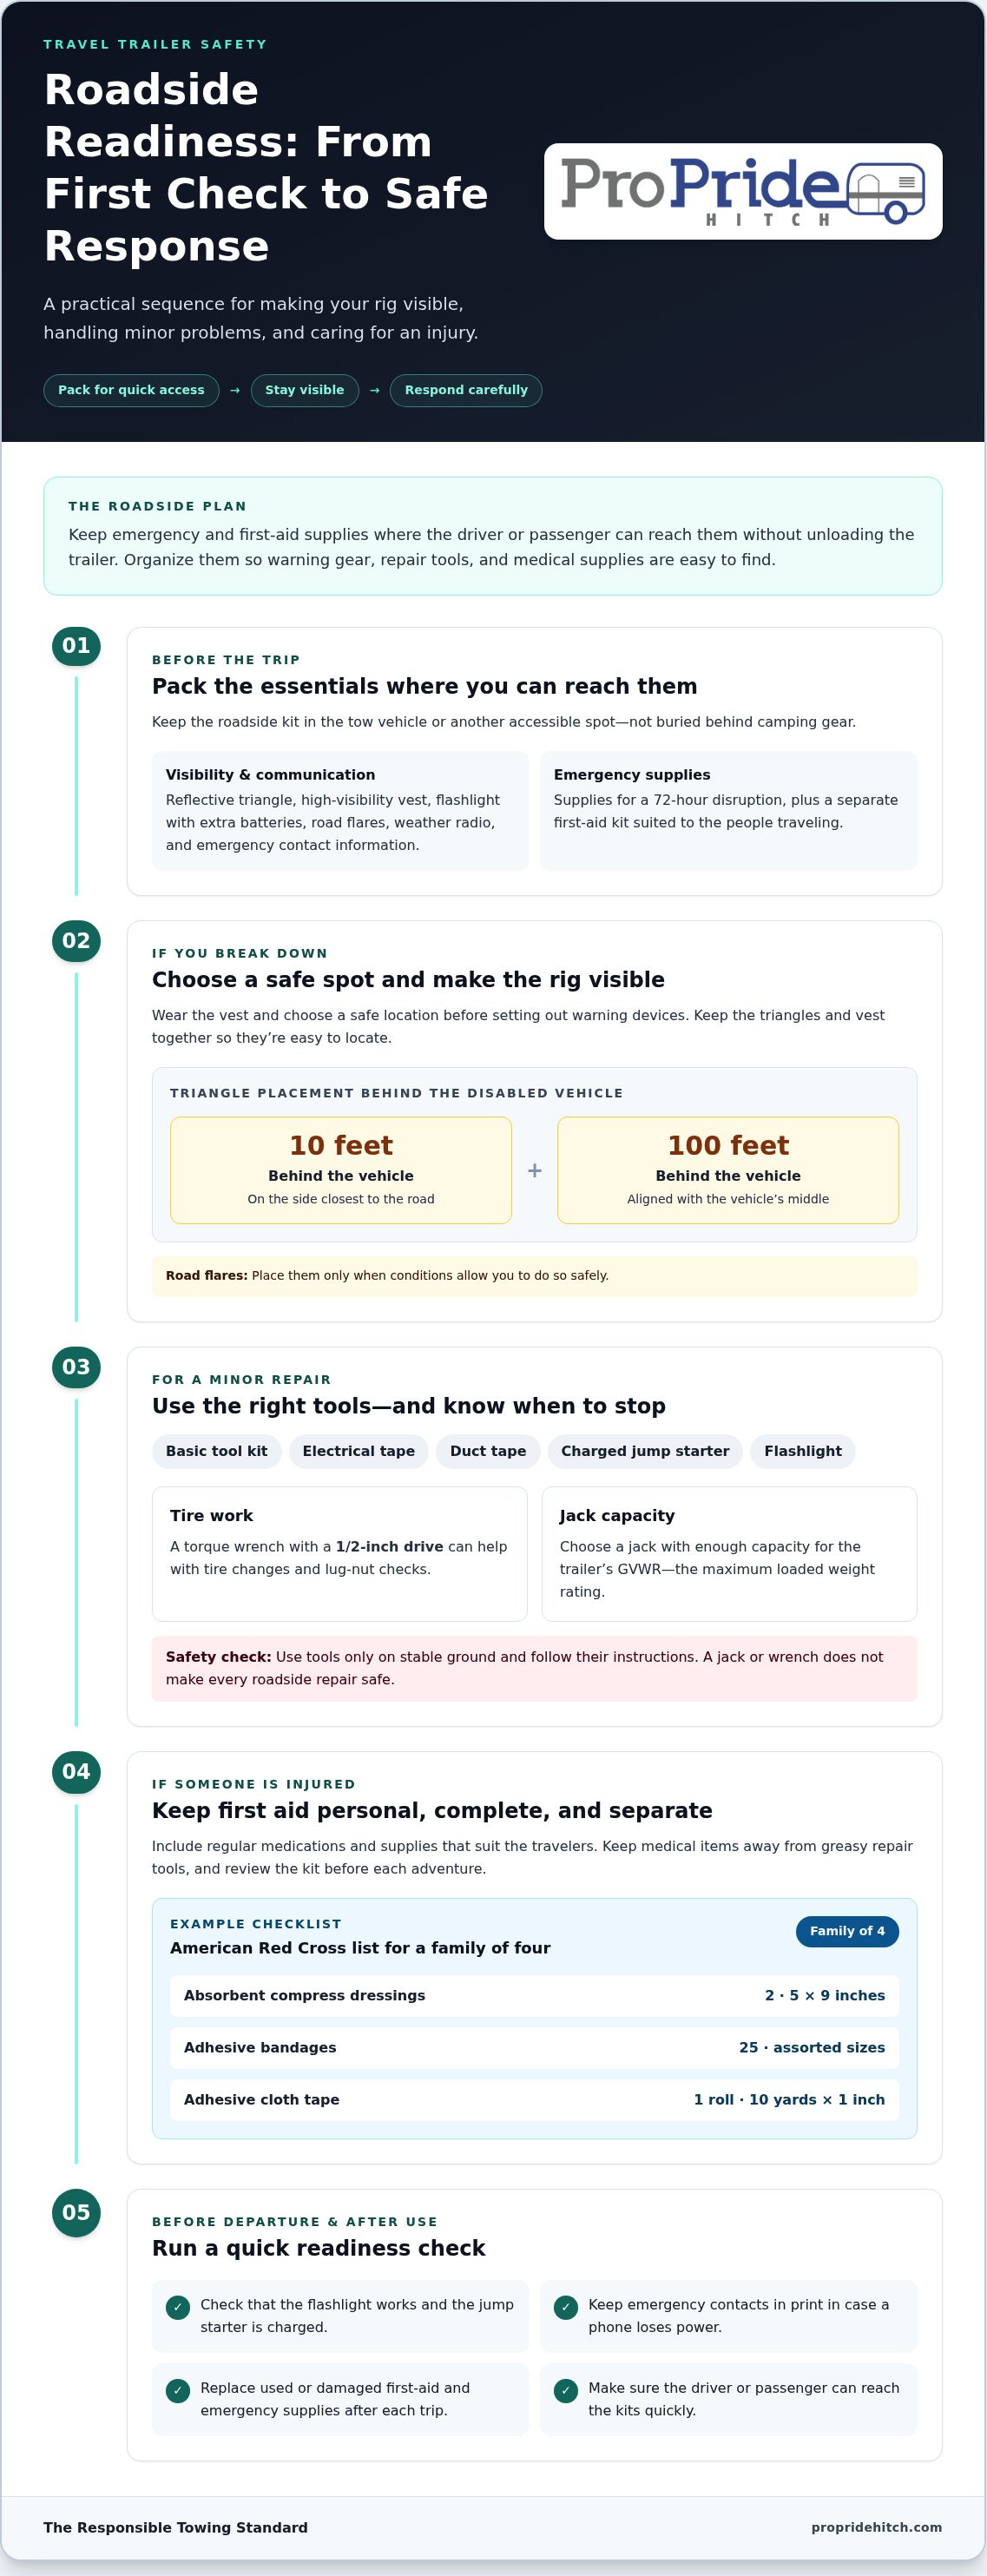
A roadside emergency kit should help you become visible, handle minor problems, and care for an injury. Keep it in the tow vehicle or another place you can reach without unloading the trailer. Include a reflective triangle, a high-visibility vest, a flashlight with extra batteries, and road flares. Add a weather radio, emergency contact information, and supplies for a 72-hour disruption. A campground reservation doesn’t remove the possibility of a delay between stops.
Visibility matters if a breakdown leaves your rig beside traffic. The article’s recommended triangle placement starts with one triangle 10 feet behind the disabled vehicle, on the side closest to the road. Place a second 100 feet behind it, aligned with the vehicle’s middle. Choose a safe location before setting out any warning device, and wear the vest so approaching drivers can see you. Keep the triangles and vest together, rather than scattered among storage compartments.
For roadside repairs, pack a basic tool kit, electrical and duct tape, and a jump starter pack. A torque wrench with a 1/2-inch drive can help with tire changes and lug-nut checks. If you carry a jack, choose one with enough capacity for your trailer’s gross vehicle weight rating, or GVWR, meaning its maximum loaded weight rating. A jack or wrench doesn’t make every roadside repair safe; use tools only on stable ground and follow their instructions. A flashlight is useful for locating equipment when a problem happens after dark.
A separate first-aid kit should suit the people traveling, including their regular medications. Stock bandages, gauze, antiseptic wipes, and prescription medications, then review the contents before each adventure. For a family of four, the American Red Cross list includes two absorbent compress dressings measuring 5 by 9 inches, 25 adhesive bandages in assorted sizes, and one adhesive cloth tape roll measuring 10 yards by 1 inch. Those examples make it easier to check whether your kit has supplies for both small cuts and larger wounds.
Store emergency and first-aid kits where the driver or passenger can reach them quickly. Keep medical supplies separate from greasy repair tools, and replace used or damaged items after each trip. Include emergency contacts in print, in case a phone loses power. Before departure, check that the flashlight works, the jump starter is charged, and warning gear is accessible. This preparation supports a safer roadside response, whether you’re heading to a nearby campground or setting out on a longer trip.
3. Fire extinguishers
A fire extinguisher is essential emergency equipment for cooking areas, appliances, and other potential ignition sources. The National Fire Protection Association estimates that 20,000 RV fires occur annually in the United States. Keep an extinguisher accessible, secured against movement, and familiar to everyone traveling in the camper. An extinguisher stored behind packed supplies won’t be easy to reach when seconds matter.
Choose extinguisher locations with access in mind. The National Park System recommends three extinguishers in an RV: one in the kitchen, one in the bedroom, and one outside in an unlocked compartment or tow vehicle. These locations place equipment near common living areas and make an outside extinguisher accessible without entering the trailer. Make sure every traveler knows where the extinguishers are before the trip.
How should safety equipment be inspected and maintained before each trip? Check that each extinguisher is accessible, has no visible damage, and its gauge points to the green section. Replace an expired extinguisher or one whose gauge falls outside that section. Include alarms, emergency supplies, and other equipment in the same pre-trip routine.
Inspect an extinguisher in a few deliberate steps. Confirm it is secured in its holder and the access path is clear. Check the gauge and look for visible damage or corrosion. Verify that the pin and tamper seal are in place, then read the manufacturer’s label for operating and maintenance instructions. The label also gives the extinguisher’s rating, which indicates the types of fires it is designed to address. Don’t assume one rating suits every situation; understand the label before an emergency.
What safety equipment is needed for travel trailers with propane appliances or lithium batteries? For propane appliances, use propane, smoke, and carbon monoxide alarms, and keep a fire extinguisher accessible. For lithium batteries, follow the battery and charger manufacturer’s safety instructions and include fire-response equipment suited to the trailer’s setup.
Replacement timing matters, too. The article recommends replacing an RV fire extinguisher about every 12 years, but an expired unit or an out-of-range gauge calls for earlier replacement. Treat the printed expiration and inspection guidance as part of the equipment, not packaging to discard. After cooking, confirm appliances are off before leaving the camper, and keep the extinguisher’s route clear. A simple check before departure makes the equipment easier to locate and use if a fire starts.
4. Wheel chocks and leveling blocks
Wheel chocks and leveling blocks solve different setup problems. Chocks help prevent a parked trailer from rolling; blocks raise a wheel or support a jack while you level the trailer. Pack both, and use them on a firm, reasonably even campsite surface. Before unhitching, position the chocks at the wheels according to their instructions and leave them in place until the trailer is ready to move. A level trailer can make daily tasks, from cooking to using the toilet, more comfortable, but leveling blocks alone won’t keep it from rolling.
Choose leveling blocks to suit your setup and carry them where you can reach them after parking. One practical option is 2-by-6-inch boards for side-to-side leveling. Place the boards under the appropriate tires, then move the trailer onto them carefully. Recheck the level before unhitching or settling in. A 3- or 4-foot carpenter’s level can help you check the trailer’s position. Keep the board stack stable; loose or uneven layers can shift under a tire.
The tongue jack needs a solid base, too. The checklist describes 4-by-4-inch wood blocks approximately 12 inches long for use under the trailer tongue jack. A jack pad serves a similar purpose by spreading the jack’s contact over a broader surface. On soft ground, use an appropriate pad or block to reduce sinking. Position it flat beneath the jack, and check that it remains stable as the tongue rises. Don’t substitute a wheel chock for a jack pad; each supports a different part of the setup.
Leveling ramps can make it easier to raise one side than arranging loose boards, while blocks offer flexible packing options. Whichever method you use, center the tire on the support and avoid driving onto an unstable stack. For a wood-based kit, one camper recommends carrying 8-10 pieces of lumber measuring 2 in × 8 in × 8 in. That is an example, not a universal packing requirement. Select supports that suit the trailer and campsite, and inspect them for cracks or damage before use.
Weather and ground conditions can change your setup. After rain, check whether the soil has softened beneath the tires or tongue jack. On an uneven site, reposition before raising the trailer further. Keep chocks, leveling blocks, ramps, and jack pads together in a labeled storage area so the right item is easy to find. Before departure, remove every support and check that none remains under the trailer. This prevents forgotten gear from becoming a road hazard and leaves the campsite ready for the next traveler.
5. Annual weight and safety-equipment checks
Set aside time annually to weigh the loaded trailer and review equipment that can age or loosen. A CAT scale check can show whether the trailer is overweight and how its load is distributed across the axles. Weigh it as you actually travel, with camping supplies, water, and gear on board. If the load changes substantially later, weigh it again. A weight check replaces packing assumptions with useful information and can reveal uneven axle loading before another trip.
Use the same annual checklist for tires and wheel hardware. Check the tire condition, confirm pressure against the tire’s recommendation, and inspect lug nuts for looseness or damage. The article recommends torquing travel-trailer lug nuts to 100 ft-lbs; use the specification for your trailer and wheels when applying torque. A TPMS can alert you to slow leaks and heat buildup while traveling, but it doesn’t replace a pressure check before departure. These steps address different risks: pressure, load, and wheel attachment.
Add age-sensitive alarms to your annual checklist. Replace an RV carbon monoxide or propane detector when it is over seven years old, as their life expectancy is under seven years. Record each detector’s installation date so its age is easy to track. Check that smoke, carbon monoxide, and propane alarms remain installed and operational, and follow their maintenance instructions. Keep spare batteries with the trailer’s electrical supplies and note when you last replaced them.
What are the U.S. legal requirements for trailer brakes, breakaway systems, safety chains, and lighting? Requirements vary with the trailer and where it travels, so review the rules that apply to its weight and route. Before departure, confirm that required brakes, breakaway equipment, chains, and lights are present and working.
How much does essential travel trailer safety equipment cost? There’s no single useful total for every trailer. The amount depends on which basics you already own and what your setup needs. Make an inventory first, then prioritize missing safety items instead of buying duplicates. Keep equipment purchases separate from routine inspection tasks, which you can often complete with tools you already have.
Use the annual review to reinforce daily tire care. Keeping tire pressure within the recommended range, staying within load limits, and inspecting tires regularly can help reduce blowout risk. Check for cuts, bulges, unusual wear, or embedded debris, and address damage before travel. Record tire readings, axle weights, detector ages, and repairs in one log. Reviewing it next year makes changes easier to spot and helps keep your travel basics ready for the next trip.
ProPride: ProPride 3P Hitch
The ProPride 3P Hitch addresses trailer sway, a separate concern from tires, roadside supplies, and campsite setup. Its patented Pivot Point Projection technology is designed to completely eliminate trailer sway by changing where the trailer pivots in relation to the tow vehicle. If sway control is part of your towing-safety planning, this hitch is a relevant next step to consider alongside routine weight and equipment checks.
No hitch replaces sound loading, suitable tire pressure, or careful driving. Review how the system works and how it fits your towing setup as part of an informed decision. To explore the hitch, visit the ProPride 3P Hitch page.
Build a Routine You Can Rely On
Safety preparation works best as a repeatable habit, not a one-time shopping trip. Keep your notes with the trailer, update them after repairs or equipment changes, and use them before departure. That way, essential travel trailer safety equipment stays connected to how you actually travel instead of becoming a checklist forgotten in a drawer.
As your towing experience grows, review the whole setup together: trailer, tow vehicle, loading, and hitch. The ProPride 3P Hitch is an option for drivers considering trailer sway control as part of that broader plan. A thoughtful decision starts with understanding your equipment and the role each component plays. That careful approach reflects The Responsible Towing Standard.
Have questions about your trailer setup? Contact ProPride with your trailer questions. Keep learning, keep preparing, and make each trip a deliberate step toward safer towing.
Frequently Asked Questions
Essential Gear for First-Time Travel Trailer Owners: What Do You Really Need?
Start with equipment for risks you can prepare for: tire problems, roadside stops, fire, injury, and campsite setup. Then organize it by use. Keep travel tools accessible from the tow vehicle, separate medical supplies from repair gear, and store setup equipment together. Before your first trip, practice locating each item while parked. A brief rehearsal can reveal missing supplies or awkward storage before you need them.
What safety equipment is essential for a travel trailer?
Prioritize equipment that supports safe travel and a stable campsite: tire and roadside tools, emergency visibility gear, first-aid supplies, fire extinguishers, working alarms, wheel chocks, and leveling supports. The right combination depends on your trailer and how you travel. For example, communication tools and emergency supplies are especially useful at a remote campsite. Review your equipment as a system, making sure items are accessible and don’t interfere with one another.
What size fire extinguisher should a travel trailer have, and where should it be mounted?
Keep a B:C-rated extinguisher by the exit, where it’s easy to reach without searching through cupboards or gear. Its rating identifies the fires it’s designed to address, so read the label and instructions before relying on it. Choose a unit that fits its mounting location securely and that travelers can handle. Check its gauge and condition regularly, and replace it if expired or if the gauge is outside the green section.
What trailer-specific emergency equipment should be carried, such as wheel chocks, leveling blocks, and a breakaway kit?
Carry chocks to help prevent movement while parked, and leveling supports suited to your trailer’s setup. A breakaway system is trailer braking equipment intended to activate if the trailer separates from the tow vehicle. Keep its components intact and follow the trailer manufacturer’s operating and maintenance instructions. Before each trip, confirm that trailer-specific equipment is present and undamaged. Store setup gear together, separately from roadside repair tools.
What spare tire, jack, lug wrench, and tire-pressure equipment fit a travel trailer?
Use a spare tire that matches the trailer’s required tire size and load rating. Select a jack with capacity for the trailer’s gross vehicle weight rating, and carry a lug wrench that fits its wheel nuts. A 1/2-inch-drive torque wrench can support accurate lug-nut checks. Keep the pressure gauge compatible with your tire’s expected range, and use the tire and trailer guidance for pressure and torque rather than relying on a generic setting.
What roadside emergency supplies are useful for travel trailer towing?
Pack reflective warning gear, a high-visibility vest, a flashlight with spare batteries, a jump starter, basic repair tools, and a first-aid kit. Include emergency contacts on paper in case a phone is unavailable. Keep these supplies in the tow vehicle or another accessible compartment, not beneath heavy cargo. Before a long trip, check that battery-powered items work and replace anything used, damaged, or missing from the kit.