
What if the most important part of installing a hitch happens before you pick up a tool? If you’re checking fit, measurements, clearance, and how to set the adjustable hitch bar, you’re asking the right questions. These common ProPride installation questions deserve clear answers before setup begins. Careful preparation helps you approach the process with confidence.
This guide covers what to prepare, which fitment details matter, and where to find ProPride installation guidance and expert help. You’ll get a clearer picture of how the ProPride 3P fits your tow vehicle and trailer, without relying on guesswork.
We’ll walk through measurements and clearance, explain what the adjustable hitch bar is designed to accommodate, and point you to ProPride’s installation resources. The 3P is designed for no-drill installation. Understanding the process before you begin is part of The Responsible Towing Standard.
Key Takeaways
- Start with the official instructions when answering common ProPride installation questions. Don’t rely on a guessed setup time.
- Follow the guide’s measurement process for your tow vehicle and trailer. The adjustable hitch bar helps match their heights.
- Work through the official instructions yourself or use ProPride’s installation resources and expert guidance.
- Before starting, follow the guide’s preparation steps and review its required-tools list.
- After installation, complete the guide’s final adjustments and review official hitching and unhitching guidance before your first tow.
Common ProPride Installation Questions: What Should You Know First?
Before starting, it’s sensible to ask whether the hitch fits your setup, what preparation is involved, and how the adjustments work. These are practical questions, not reasons to copy another owner’s measurements. Start with the official ProPride 3P installation guide. Read it before beginning so you understand the full sequence, know what you’ll need, and can pause on any step that isn’t clear.
The hitch includes a main unit, an adjustable hitch bar, weight-distribution jacks, and a yoke. The adjustable bar accommodates different tow-vehicle and trailer heights, but its position depends on your measurements and the instructions. Another owner’s setup isn’t a substitute for following the guide for your own combination. The ProPride 3P is designed for installation without drilling into the trailer frame. Learn more about the ProPride 3P trailer sway control hitch and its integrated design on the product page.
Is ProPride installation manageable for a first-time installer?
Preparation makes the process easier to approach: have the instructions in front of you and take each step in order. Your experience with mechanical work may affect how comfortable installation feels, so there isn’t one completion time that applies to every owner. Read the full guide before starting. This gives you a chance to understand the sequence and identify questions before the hitch is partly assembled.
What should you review before starting?
Familiarize yourself with the main hitch unit, adjustable hitch bar, weight-distribution jacks, and yoke. Then check the official guide’s required-tools list against what you have. General preparation helps you work methodically, but use the guide for model-specific measurements and setup steps.
- Identify the components: Match the parts you have with the names and diagrams in the guide.
- Review the tool list: Gather the tools specified in the official instructions before starting.
- Separate general advice from setup directions: Use general tips to organize your work, but rely on the guide for measurements and adjustments.
Keep the installation guide available as you work instead of depending on memory or an unrelated setup example. If your measurements, parts, or a step don’t align with the instructions, pause and use ProPride’s official resources or expert help before proceeding. Understand the sequence first, then follow it carefully. That’s part of The Responsible Towing Standard.
How Do Measurements and the Adjustable Hitch Bar Affect Fit?
Fit depends on the relationship between your tow vehicle, trailer, and hitch. The adjustable hitch bar helps match different vehicle and trailer heights, but choosing a position isn’t a matter of copying another owner’s setup. Their measurements reflect their own equipment and conditions. Follow the ProPride installation guide’s measurement instructions for your combination.
Hitch-bar angle and ground clearance can also raise questions. Both depend on how the hitch sits in relation to the vehicle and trailer, so a position that looks suitable in a photo or forum post may not suit your setup. Use the guide’s measurements and adjustment steps as your reference. Don’t treat another owner’s clearance or bar angle as a target.
Which measurements matter when checking fit?
Use the official guide to identify the measurement points and how to record them. Take measurements under the conditions specified in the guide. For example, if it directs you to measure with the trailer level, keep it level and position the vehicle and trailer as instructed. A change in position can affect the readings. There isn’t one set of dimensions for every combination, so don’t apply figures from a forum post as universal values.
Write each measurement beside the corresponding step in the guide. If a reading seems unexpected, repeat it under the same conditions and check that you’re measuring the point shown in the instructions. Don’t adjust the bar to make a number match someone else’s setup. The goal is to follow the prescribed process for your own vehicle and trailer.
How does the adjustable hitch bar help with different setups?
The adjustable bar provides different offset positions to accommodate different tow-vehicle and trailer heights. The selected position affects how the hitch aligns with your combination. Use your measurements and the installation guide to choose the appropriate setup. Don’t assume a particular angle or clearance will work across different trailers.
If you’re comparing equipment before installation, review the ProPride 3P hitch details alongside the installation instructions. This helps connect the hitch’s adjustable design with the setup process. If you still have a fit or alignment concern after installation, use ProPride’s official troubleshooting guidance for that issue and review the relevant hitching and setup steps before making further adjustments.
Measurements are useful when they’re taken consistently and applied to the instructions for your hitch. Record your readings, follow the sequence, and use the guide to resolve clearance and bar-angle questions instead of guessing. That keeps fitment decisions grounded in your own combination, an important part of The Responsible Towing Standard.
Can You Install a ProPride 3P Yourself or Get Installation Help?
Choose the approach that suits your experience and comfort level. Some owners work through the official installation instructions themselves; others want expert guidance when a product-specific question comes up. Either way, use ProPride’s instructions for the installation steps. Personal advice can offer context, but it shouldn’t replace the directions for your setup.
ProPride sells the ProPride 3P Hitch and provides installation resources, including a step-by-step guide and an expert-help option. These resources support owners through the process, but they are distinct from the Install Network, where participating owners install hitches for others. If you’re learning about the system, review the ProPride 3P Hitch details alongside the installation guidance.
What support is available if a setup question comes up?
Start with the official installation guide and find the step related to your question. Check its diagrams and instructions before proceeding, especially if the question concerns assembly or adjustment. If the written guidance doesn’t resolve a product-specific concern, use the expert-help option associated with the official resources. Having the relevant step in front of you and clearly describing what’s unclear can help focus the discussion. Don’t substitute a guess or an unrelated owner’s setup for the instructions.
The decision path is straightforward: consult the guide first, then use expert guidance if you still need help interpreting a step. If you’re uncertain about proceeding, pause rather than forcing an adjustment. Careful follow-through matters more than moving quickly.
What is the ProPride Install Network?
The ProPride Install Network is a program through which owners can install ProPride 3P hitches for other customers. It offers participating owners a paid installation opportunity. The network is separate from ProPride’s installation instructions and expert-help resources. The guide supports owners doing their own setup, while network participants perform installations for others.
You can follow the official directions yourself or use installation help from a network participant. Consider how comfortable you are carrying out the steps, whether you can work through the guide carefully, and whether you prefer hands-on help. Common ProPride installation questions often come down to identifying the kind of support you need, rather than finding one answer for every owner.
Whichever route you choose, keep the official instructions central to the process. They provide the product-specific steps, expert guidance can help address questions, and the Install Network offers an option for owners seeking installation by a participating owner. Understanding the difference helps you plan your ProPride 3P setup.
What Preparation Helps Prevent Avoidable Installation Problems?
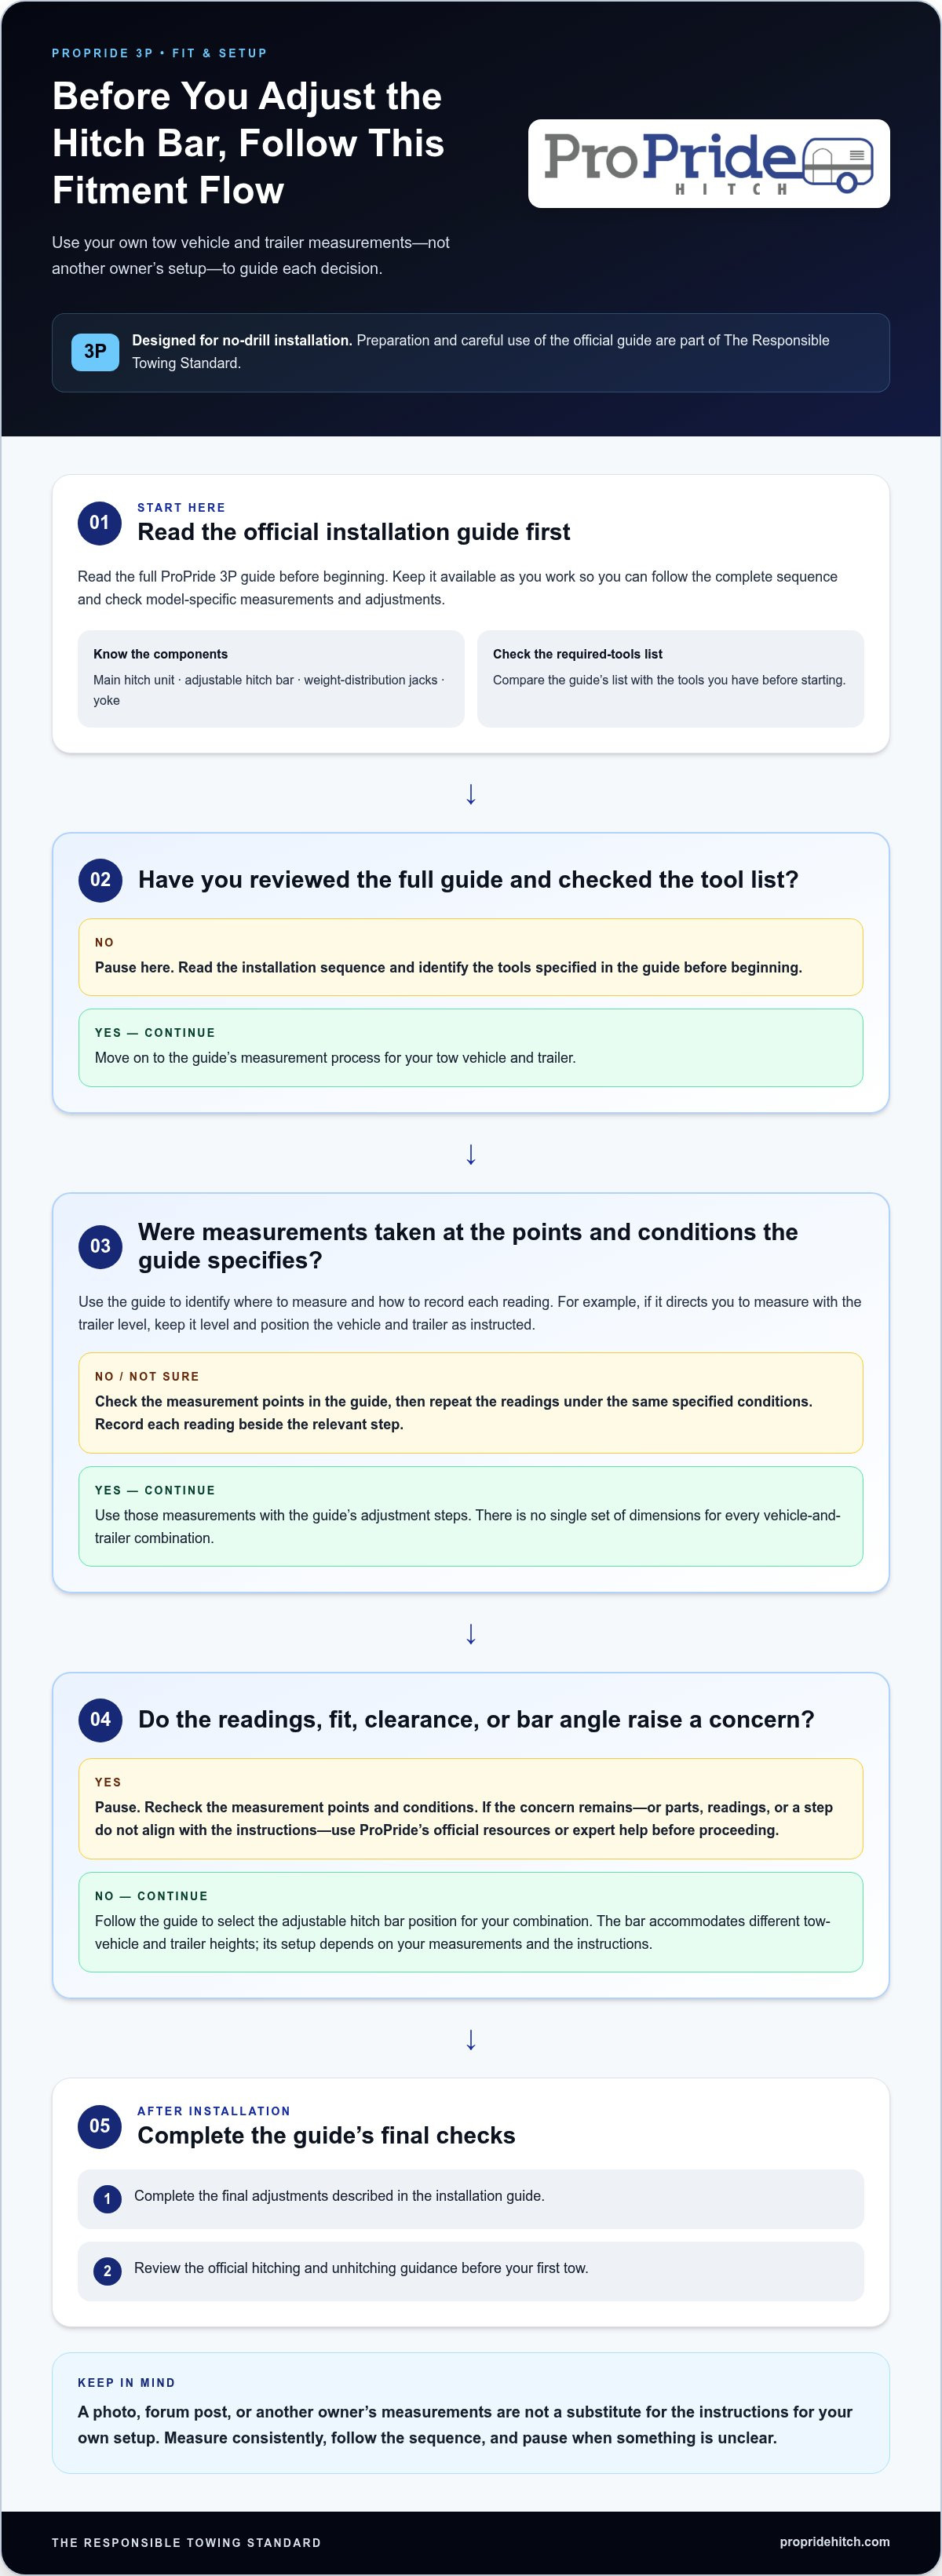
Organizing before assembly can prevent avoidable interruptions. Use the official guide to plan the work, confirm you have the listed tools and parts, and prepare your workspace. The goal isn’t to add steps or guess what installation requires. It’s to be ready to follow the instructions carefully, a useful habit for responsible travel-trailer towing.
Use this sequence to get ready:
- Read the installation guide. Review the full sequence so you understand how the steps fit together before starting.
- Check the parts. Compare the components with the guide’s descriptions and diagrams before assembly.
- Review the required-tools list. Set out the tools named in the official instructions and confirm you have what the guide calls for.
- Organize your work area. Keep the instructions, parts, and tools accessible. Follow the guide’s directions for the installation surface and setup conditions.
How should you prepare tools and components?
Use the official required-tools list as your checklist, not a list from another owner’s post. Lay out the tools and compare the hitch components with the guide before assembly. This can reveal a missing tool or a part you haven’t identified before the work is underway.
Keep parts grouped so you can match them to the diagrams, and keep the guide nearby. Don’t add tool specifications or substitute a different sequence based on assumptions. The model-specific instructions explain what this installation requires.
What should you do if a measurement or fit looks wrong?
Pause. Return to the relevant measurement step and check that you followed its directions and used the correct reference points. Don’t improvise an adjustment to make the fit look right, and don’t assume another owner’s vehicle-specific measurements apply to your setup.
If the measurement still seems inconsistent, or a product-specific fit question remains, use the official expert-help option before proceeding. Make a note of the step and what you observed so you can describe the question clearly. It’s better to resolve uncertainty than to build on an assumption.
Preparation is part of The Responsible Towing Standard: follow the official sequence, organize what you need, and resolve uncertainties before moving on. For more information about the hitch as you prepare, explore the ProPride 3P Hitch.
What Happens After Installation, and Where Do You Go Next?
Finishing assembly isn’t the last step. Follow the official installation guide through its final adjustments, then review ProPride’s hitching and unhitching guidance before your first tow. The installation guide covers setup; hitching and unhitching instructions explain how to connect and disconnect the trailer. Understand each process before relying on memory.
If something doesn’t look or feel right after setup, don’t adjust it based on guesswork. Match your question to the right resource:
- Installation step or adjustment: Return to the official installation guide and use its expert-help option for unresolved product-specific questions.
- Concern that appears after setup: Consult the ProPride 3P Hitch Troubleshooting article for relevant guidance.
- Connecting or disconnecting the trailer: Review the official hitching and unhitching instructions before towing.
Keep these categories distinct. Installation guidance explains how to set up the hitch, troubleshooting addresses concerns that arise, and maintenance and towing-use guidance cover other aspects of ownership. Choosing the resource that matches your question makes the next step clearer.
Which resources answer follow-up setup questions?
For a question about an installation step, start with the official guide and use its expert-help option if the instructions don’t resolve the issue. For a concern that develops after setup, consult the troubleshooting article. Before towing, review hitching and unhitching guidance separately. This helps you find focused instructions without treating every question as an installation problem.
How should an owner move from research to a decision?
Before choosing a hitch, review fitment for your vehicle and trailer, the measurements that inform setup, and the preparation required by the installation guide. If comparing capacity options, the listed choices are 600 lb, 800 lb, 1000 lb, and 1400 lb. Use the product details and official instructions to understand the system and its setup requirements. Another owner’s combination isn’t a fitment reference for yours.
Common ProPride installation questions lead back to a steady process: understand your setup, follow the instructions, and know where to find the next answer. For a closer look at the hitch’s features and product details, review the ProPride 3P Hitch. A considered decision and methodical setup reflect The Responsible Towing Standard.
Make Your Next Towing Decision With Confidence
As you consider common ProPride installation questions, give yourself time to make an informed decision. Think about what you need from your towing setup and which details you want to understand before choosing equipment. A deliberate decision is a meaningful step toward traveling with greater confidence.
Research is part of responsible ownership. Take time to weigh your priorities, discuss the decision with the people who’ll share the journey, and choose the option that fits your plans. That care reflects The Responsible Towing Standard.
When you’re ready to take the next step, review the ProPride 3P Hitch and consider whether it’s right for your towing plans. Explore the product details and make your decision with the information you need.
Frequently Asked Questions
What makes the ProPride 3P design unique?
The ProPride 3P features distinct engineering elements: an adjustable hitch bar, a one-piece yoke, no-drill installation, top-mounted weight-distribution jacks, bolted spring bars, powder-coating pre-treatment, thicker control links, and a reinforced hitch box. These components work together to provide a secure and reliable towing setup, so review your specific hardware and construction requirements during setup.
Does the ProPride 3P also distribute weight?
Yes. Weight distribution is built into the hitch and functions independently of sway control. These are separate functions within one system: weight distribution addresses how the trailer’s load is supported, while sway control addresses trailer movement. Understanding the distinction helps when assessing your towing setup. Follow the instructions for adjustments.
Can a ProPride 3P be used with a half-ton truck?
Yes. A half-ton truck isn’t automatically ruled out, and customer testimonials describe successful use with these trucks. However, a truck category alone can’t establish whether a specific vehicle and trailer are a suitable combination. Assess the requirements and limits of your own equipment, including the tow vehicle and trailer together. Other owners’ experiences are examples, not a substitute for evaluating your configuration.
How does the ProPride 3P turn if its projected pivot point is near the rear axle?
The driver can still control a turn. Pivot Point Projection works in one direction. When turning force comes from the tow-vehicle side, the effective pivot point shifts to the hitch ball. The hitch allows a turn radius of up to 87 degrees when backing up. The projected pivot point therefore doesn’t prevent ordinary turning. Follow the operating guidance as you become familiar with maneuvering.
What capacity options are available for the ProPride 3P Hitch?
The options are 600 lb, 800 lb, 1000 lb, and 1400 lb. Use capacity information as one part of evaluating your towing combination, not as a standalone answer about suitability. Choosing an option based only on truck class or another owner’s selection leaves out the trailer and the rest of your setup. Consider your complete configuration.
Where can owners find official installation help for the ProPride 3P?
ProPride, Inc. provides a step-by-step installation resource and an expert-help option. To make your question specific, identify the installation step you’re working on and describe what you’re seeing or unsure about. Owners interested in installing hitches for others can also learn about the separate Install Network paid opportunity.
Does the ProPride 3P use friction to control trailer sway?
No. The ProPride 3P uses patented Pivot Point Projection technology rather than friction-based sway damping. The design projects a virtual pivot point near the tow vehicle’s rear axle. Keep this distinction in mind when comparing hitch designs, and consider fit and setup requirements separately.